Drive Setup
Boiled down, RaSCSI simply presents one or more files on the Raspberry PI filesystem as SCSI Disks. So you will create or already have a file somewhere on your Raspberry Pi, use rasctl to presents it as a disk on the SCSI Bus, then your computer treats it like a hard drive, MO disk, CD Rom, etc. This document talks about creating images, presenting them with RaSCSI on the SCSI Bus, and how to use them on your target computer.
These instructions assume you store images in /home/pi/images directory. In the event it does not already exist, lets create it. Run the following commands on your Raspberry Pi to create /home/pi/image.
mkdir /home/pi/images
ls -lad /home/pi/images
You should see the following after running the above.
pi@raspberrypi:~ $ mkdir /home/pi/images
pi@raspberrypi:~ $ ls -lad /home/pi/images
drwxr-xr-x 2 pi pi 4096 Sep 11 00:05 /home/pi/imagesTo start, your new hard drive image can be a file full of zeros. This basic walk through goes over creating a new file using the Linux dd utility on your Pi. If you are looking for additional information on how to use dd, check out the wikipedia article, or read the man page.
Run the following commands to create an empty hard drive image named /home/pi/images/new_drive.hda
dd if=/dev/zero of=/home/pi/images/new_drive.hda bs=4M count=100
ls -la /home/pi/images/new_drive.hda
Output from the above commands should look like this
pi@raspberrypi:~ $ dd if=/dev/zero of=/home/pi/images/new_drive.hda bs=4M count=100
100+0 records in
100+0 records out
419430400 bytes (419 MB, 400 MiB) copied, 39.3795 s, 10.7 MB/s
pi@raspberrypi:~ $ ls -la /home/pi/images/new_drive.hda
-rw-r--r-- 1 pi pi 419430400 Sep 11 04:50 /home/pi/images/new_drive.hda
In the above example, bs is the block size, and count is the number of blocks. The above command will create an empty 400MB (4M x 100) image located at /home/pi/images/new_drive.hda. If bs is not specified, dd will use the default block size of 512, and you will need to adjust the count. Setting bs to 4M will speed up the file creation significantly.
Once you have the image created, we need to find an unused SCSI ID to attach the image to. Use rasctl -l to list the current SCSI IDs being used by RaSCSI.
rasctl -lFor a new installation, you should see an output similar to the following.
pi@raspberrypi:~ $ rasctl -l
No images currently attached.
From the output above, we see RaSCSI is using no SCSI IDs. We will use ID 1 to attach our newly created 400MB image.
Note: rasctl -l only shows SCSI IDs presented via RaSCSI. It does not report other devices on the SCSI bus. You will want to use a utility or tool on your target computer to find what SCSI IDs are available to use. For example, Macintosh computers reserve SCSI ID 7 the onboard SCSI controller.
The next two commands will attach the new_drive.hda to SCSI ID 1, then show a list of the currently attached images.
rasctl -i 1 -c attach -t hd -f /home/pi/images/new_drive.hda
rasctl -l
And once done, you should see something similar to ...
pi@raspberrypi:~ $ rasctl -i 1 -c attach -t hd -f /home/pi/images/new_drive.hda
pi@raspberrypi:~ $ rasctl -l

+----+----+------+-------------------------------------
| ID | UN | TYPE | DEVICE STATUS
+----+----+------+-------------------------------------
|  1 |  0 | SCHD | /home/pi/images/new_drive.hda
+----+----+------+-------------------------------------
From the rasctl output above, we see new_drive.hda image is now attached to SCSI ID 1.
With that complete, you can boot up the target computer that has the RaSCSI attached, and initalize or format the new disk.
The following images show this process on a Macintosh running MacOS 8 (I think)

|
On a Macintosh running Classic MacOS you would open Apple's Drive Setup. Once open, you should see your new drive in the list as <not initialized>. Note: If you have issues initializing the drive, Consider trying Lido or SCSI Probe. They can be more forgiving than Apple's Drive Setup. |

|
In the warning dialog box, click "Initialize". Note: Be careful to initialize the correct drive! |
|
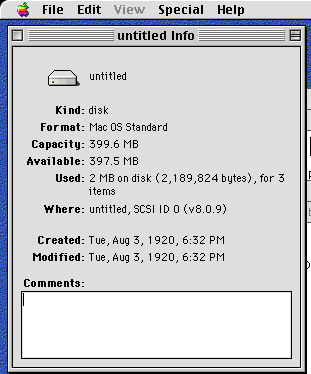
After the drive initialization completes, you should have a drive called "Untitled" with approximately the same amount of space as the .HDA you created. |
The instructions up to this point are great for new users of the RaSCSI software. The following sections dig deeper into things you can do with RaSCSI.
RaSCSI can mount CD ISO images and MO (Magneto Optical) images.
Note: The Apple CD-ROM drivers in classic versions of MacOS will NOT work with RaSCSI. Additional details can be found in Issue #1. A patch is needed in order MacOS to recognize the drive. You can read more about ResExcellence's CD-ROM driver hack, or check out 3rd party CD-ROM drivers like CD-Sunrise which may also work.
RaSCSI also supports mounting MO images. As of 2020-09-14, we have not tested this with an image directly from an MO disk. An article on the NFGames forum indicates MO images need to be 228518400 bytes in size to work properly. This still needs testing.
Seriously, who named this section ? :)
As the RaSCSI software was originally written for use with the Sharp X68000 computer, it supports a few image formats. The following shows the output from rascsi --help. The list of supported image types is at the bottom.
pi@raspberrypi:~ $ rascsi --help
SCSI Target Emulator RaSCSI(*^..^*) version 1.47(Sep 11 2020, 03:44:06)
Powered by XM6 TypeG Technology / Copyright (C) 2016-2020 GIMONS
Connect type : STANDARD

Usage: rascsi [-IDn FILE] ...

 n is SCSI identification number(0-7).
 FILE is disk image file.

Usage: rascsi [-HDn FILE] ...

 n is X68000 SASI HD number(0-15).
 FILE is disk image file.

 Image type is detected based on file extension.
  hdf : SASI HD image(XM6 SASI HD image)
  hds : SCSI HD image(XM6 SCSI HD image)
  hdn : SCSI HD image(NEC GENUINE)
  hdi : SCSI HD image(Anex86 HD image)
  nhd : SCSI HD image(T98Next HD image)
  hda : SCSI HD image(APPLE GENUINE)
  mos : SCSI MO image(XM6 SCSI MO image)
iso : SCSI CD image(ISO 9660 image)In this section we will review the images currently attached to RaSCSI, and detach one or two.
1. use rasctl -l to get a listing of currently attached images.
pi@raspberrypi:~ $ rasctl -l

+----+----+------+-------------------------------------
| ID | UN | TYPE | DEVICE STATUS
+----+----+------+-------------------------------------
|  1 |  0 | SCHD | /home/pi/images/new_drive.hda
|  2 |  0 | SCHD | /home/pi/images/lando.hda
|  3 |  0 | SCHD | /home/pi/images/griffin.hda
|  4 |  0 | SCHD | /home/pi/images/is.hda
|  5 |  0 | SCHD | /home/pi/images/awesome.hda
|  6 |  0 | SCHD | /home/pi/images/small_drive.hda
+----+----+------+-------------------------------------
2. We want to detach /home/pi/images/small_drive.hda, which is on SCSI ID6. Use the following commands will detach new_drive.hda, then run rasctl -l again to show the still mounted images.
rasctl -i 6 -c detach
rasctl -l
And the output should look like this..
pi@raspberrypi:~ $ rasctl -i 6 -c detach
pi@raspberrypi:~ $ rasctl -l

+----+----+------+-------------------------------------
| ID | UN | TYPE | DEVICE STATUS
+----+----+------+-------------------------------------
|  1 |  0 | SCHD | /home/pi/images/new_drive.hda
|  2 |  0 | SCHD | /home/pi/images/lando.hda
|  3 |  0 | SCHD | /home/pi/images/griffin.hda
|  4 |  0 | SCHD | /home/pi/images/is.hda
|  5 |  0 | SCHD | /home/pi/images/awesome.hda
+----+----+------+-------------------------------------At this point we can start the RaSCSI service and attach images to it. If you want RaSCSI to present disks on the SCSI bus when the service starts up, follow the next few steps.
The configuration for the rascsi service lives in /etc/systemd/system/rascsi.service. We will edit this file and update ExecStart.
On a new installation, the line looks like this..
pi@raspberrypi:~ $ grep ExecStart /etc/systemd/system/rascsi.service
ExecStart=/usr/local/bin/rascsi
To load disk images on startup, make the following changes.
1. Determine what image you want to present, and what SCSI IDs you want to use. In this example we will mount two images.
/home/pi/images/400MB-system-disk.hda will be on SCSI ID 1
/home/pi/images/this-house-is-a-prison.hda will be on SCSI ID 2
/home/pi/images/simcity.iso will be on SCSI ID 5
2. Open /etc/systemd/system/rascsi.service with your favotite editor, making sure to prepend sudo to your command.
sudo vi /etc/systemd/system/rascsi.service3. Find the line starting with ExecStart, and comment it out by adding # to the beginning of the line. It should look like this.
#ExecStart=/usr/local/bin/rascsi
4. Below that line, add a new one as follows...
ExecStart=/usr/local/bin/rascsi -ID1 /home/pi/images/400MB-system-disk.hda -ID2 /home/pi/images/this-house-is-a-prison.hda -ID5 /home/pi/images/simcity.iso5. Save the file and exit the editor.
Note: If in the future you make any changes to the rascsi.service file like the above, you will need to run "sudo systemctl daemon-reload" for systemd to read your changes.
6. With that completed, we will instruct systemd to re-read the configuration file, restart the rascsi service, then confirm our intended images are attached.
sudo systemctl daemon-reload
sudo systemctl restart rascsi.service
rasctl -l
If everything worked, you should see the following
pi@raspberrypi:~ $ sudo systemctl daemon-reload
pi@raspberrypi:~ $ sudo systemctl restart rascsi.service
pi@raspberrypi:~ $ rasctl -l

+----+----+------+-------------------------------------
| ID | UN | TYPE | DEVICE STATUS
+----+----+------+-------------------------------------
|  1 |  0 | SCHD | /home/pi/images/400MB-system-disk.hda
|  2 |  0 | SCHD | /home/pi/images/this-house-is-a-prison.hda
|  5 |  0 | SCCD | /home/pi/images/3d-atlas.iso(WRITEPROTECT)
+----+----+------+-------------------------------------If you've made it this far, you're awesome!! The next part is how to make mounting/unmounting images easier. A web interface for RaSCSI has been developed to help in this area. Proceed to the Web Interface page. There we will learn about setting up the RaSCSI management web page, and how to use it.
In the following steps, we will take a hard drive image that has already been formatted by a Macintosh computer, and mount it on your Raspberry Pi. The example assumes the disk was formatted with the HFS filesystem on MacOS 7 or similar.
Note! Make sure the image you're about to mount is NOT attached with RaSCSI. You may be able to mount a currently attached disk image, but chances are high the filesystem will be damaged, leading to data loss. Use the rasctl commands covered earlier to confirm the image is not attached.
1. Install the hfsprogs package on your Raspberry Pi. This package contains the modules required to mount HFS formatted disks (and images). Run the following command to install the hfsprogs package.
sudo apt-get install --yes hfsprogsYou should see something similar to the following.
pi@raspberrypi:~ $ sudo apt-get install --yes hfsprogs
Reading package lists... Done
Building dependency tree
Reading state information... Done
The following additional packages will be installed:
  libssl1.0.2
The following NEW packages will be installed:
  hfsprogs libssl1.0.2
0 upgraded, 2 newly installed, 0 to remove and 11 not upgraded.
Need to get 0 B/1,011 kB of archives.
After this operation, 2,767 kB of additional disk space will be used.
Preconfiguring packages ...
Selecting previously unselected package libssl1.0.2:armhf.
(Reading database ... 41077 files and directories currently installed.)
Preparing to unpack .../libssl1.0.2_1.0.2q-2_armhf.deb ...
Unpacking libssl1.0.2:armhf (1.0.2q-2) ...
Selecting previously unselected package hfsprogs.
Preparing to unpack .../hfsprogs_332.25-11+b1_armhf.deb ...
Unpacking hfsprogs (332.25-11+b1) ...
Setting up libssl1.0.2:armhf (1.0.2q-2) ...
Setting up hfsprogs (332.25-11+b1) ...
Processing triggers for man-db (2.8.5-2) ...
Processing triggers for libc-bin (2.28-10+rpi1) ...
pi@raspberrypi:~ $
2. With the hfsprogs package installed, next we install the hfs kernel module. This is needed for Linux to understand the HFS filesystem contained in the image file.
sudo modprobe -a hfs
lsmod | grep hfs
From running the above, you should see the following.
pi@raspberrypi:~ $ sudo modprobe -a hfs
pi@raspberrypi:~ $ lsmod | grep hfs
hfs                    65536  0
3. Create a directory to mount the hard disk image to. This can be any directory. We are using /mnt/RaSCSI in this example.
sudo mkdir /mnt/RaSCSINote: sudo is being used with the above command as /mnt is not writeable by the pi user. You are welcome to create a target directory somewhere the Pi user already has permissions, and would not need to prepend sudo to mkdir
4. Find the hard disk image you want to mount on the Raspberry Pi. Assuming your disk images are in /home/pi/images, you can simply list the contents of that directory and decide which you want. In this example we will use /home/pi/images/small_drive.hda.
ls -la /home/pi/imagesOn the test instillation looks like this.
pi@raspberrypi:~ $ ls -la /home/pi/images
total 542732
drwxr-xr-x 2 pi pi      4096 Sep 10 23:51 .
drwxr-xr-x 7 pi pi      4096 Sep 11 00:45 ..
-rw-r--r-- 1 pi pi 419430400 Sep 10 23:34 new_drive.hda
-rw-r--r-- 1 pi pi  52428800 Sep 10 23:49 small_drive.hda
5. Mount the image. The following command will use a loop device to mount the image. Using a loop device allows the kernel to treat the image like a typical block device (hard drive, usb storage, optical drive, etc). You can find more information on loop devices at this wikipedia article.
sudo mount -o loop /home/pi/images/small_drive.hda  /mnt/RaSCSI
mount | grep RaSCSI
ls -la /mnt/RaSCSI
If the mount was successful, you will see the mount information, and get a directory listing of the contents from your hard disk image.
pi@raspberrypi:~ $ sudo mount -o loop /home/pi/images/small_drive.hda  /mnt/RaSCSI
pi@raspberrypi:~ $ mount | grep RaSCSI
/home/pi/images/small_drive.hda on /mnt/RaSCSI type hfs (rw,relatime,uid=0,gid=0)
pi@raspberrypi:~ $ ls -la /mnt/RaSCSI
total 130
drwxr-xr-x 1 root root     10 Sep 10 23:43  .
drwxr-xr-x 3 root root   4096 Sep 11 01:00  ..
-rw-r--r-- 1 root root     31 Oct  1  1993 'ClarisWorks 2.0'
-rw-r--r-- 1 root root  14336 Jun 26  2019 'Desktop DB'
-rw-r--r-- 1 root root 113304 Jun 26  2019 'Desktop DF'
drwxr-xr-x 1 root root      4 Jun 26  2019 'DiskCopy 6.3.3'
-rw-r--r-- 1 root root      0 Apr 27  1994 'Disk First Aid'
drwxr-xr-x 1 root root      2 Sep 10 23:43  Downloads
drwxr-xr-x 1 root root      4 Jun 26  2019 'SCSIProbe 4.3 folder'
drwxr-xr-x 1 root root      5 Jul 18  2010 'StuffIt Expander'$'\252'' 4.0.2'
6. You can now access this disk like any other drive mounted with the HFS filesystem.
7. Once you are done working on the mounted image, use the following command to unmount the hard disk image.
sudo umount /mnt/RaSCSI
mount | grep RaSCSI
The above will umount the HFS disk image, and show the output from mount, confirming the image is no longer mounted.
pi@raspberrypi:~ $ sudo umount /mnt/RaSCSI
pi@raspberrypi:~ $ mount | grep RaSCSI
8. From here you could use rasctl to re-attach the image and present it on the SCSI bus.