Flow over plate Code_Aster Tutorial
Now that you have Code_Aster, preCICE, the preCICE Python bindings, and the Code_Aster adapter up and running, it is time to run our first coupling tutorial. In this tutorial we will simulate flow over a heated plate with a fluid and a solid solver. We will use Code_Aster for solving the heat transfer in the solid domain, and OpenFOAM for solving the heat transfer in the fluid domain. Therefore, please also install OpenFOAM and the openfoam-adapter before continuing with this tutorial.
This tutorial is meant to also give some insight in the workflows of Code_Aster and preCICE. For those who wish to get a quick coupling working, please jump to Quick Tutorial.
The setup for this tutorial is identical to the flow over heated plate using OpenFOAM. In this tutorial OpenFOAM is used as the solver for the fluid domain, and Code-Aster is the solver for the solid domain.
You can find the tutorial files in the tutorial repository (TODO: Move case and add link). This directory contains, among others, the following files:
-
solid.astk: In a Code_Aster case, there is always an export file that links all the separate case files, specifying their functionality and their location. The export file also sets additional, system-dependent variables therefore it must be generated fromsolid.astk. The export file is to be generated from thesolid.astkfile, which can be done in ASTK as described below. -
solid.mmed: This is the file that contains the mesh of the solid domain for Code_Aster. It can be opened and adapted with Salome Meca.
Code_Aster works with command files, which are the basis of every simulation case. The command files define the problem, the boundary conditions, the mesh that is used, and more parameters. In the Code_Aster-Adapter, we use three command files:
-
adapter.comm: This is the main command file of a Code_Aster coupling. Code_Aster starts at this command file, which wraps the solver call in a loop and triggers the coupling operations. Through the INCLUDE command, invoked at the beginning, the other command files are included. This file is part of the Code_Aster adapter. -
def.comm: The test-case is defined in this command file. It is in charge of setting the mesh, model, materials, initial and boundary conditions. This file is case specific and is found in the tutorial repository (TODO: Move case and add link). -
config.comm: This file is used to configure the coupling. This file is part of the Code_Aster adapter
Additionally, the following files are created when the coupling is run:
-
solid.mess: An output (message) file, which contains the Code_Aster log of a run. -
solid.rmed: This file is the 'result mesh' file, and has the same format as the mesh filesolid.mmed. It contains the result of the solid domain after a run, and can be opened with Salome Meca.
The solid.export file that is included in the tutorial needs to be configured for your local system. You can generate this file using ASTK:
- Start
astkfrom your terminal. - Click "File > Open..." and select the file
solid/solid.astk. - In the Base path field, set the path to your
solid/directory. - Select under
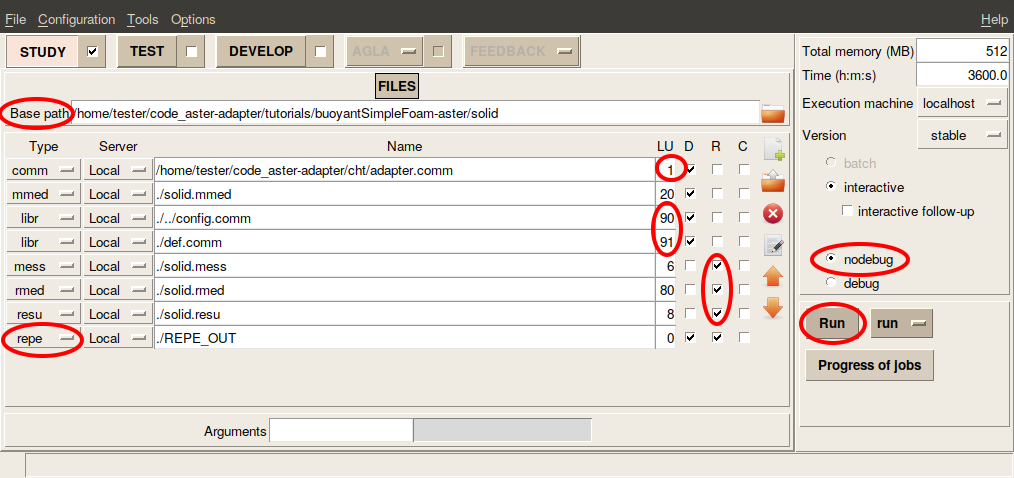
D(input) the filesadapter.comm,solid.mmed,config.comm,def.comm. Select underR(output) the filessolid.mess,solid.rmed,solid.resu. - For the
.commfiles, make sure thatadapter.commis assigned toUNIT=1,def.commis assigned toUNIT=91, andconfig.commhasUNIT=90. Theadapter.commis the command file that comes with the Code_Aster adapter. For the rest of the files, ASTK will give the default UNIT values. Make sure that these correspond to the values in the image below. Lastly, make sure that in ASTK, thenodebugmode is selected. - Lastly, add a new field of type
repe, by pressing theAdd Entrybutton on the right. In this field, pointREPE_OUTto be located in the solid directory, as shown in the image below. Make sure to also create this directory on your system. ThisREPE_OUTfolder will hold thermedoutput files of Code_Aster. - Now that you have updated the
solid.astkfile, save and export it. - Click "Run" to generate the rest of the files. You can then quit ASTK.
Before you can run the test-case, you need an additional change: In config.comm, change the base-path in line 2 to the path of the tutorial folder on your local system. For example:
{'base-path': '/home/tester/code_aster-adapter/tutorials/buoyantSimpleFoam-aster',
Everything is now set for your first OpenFOAM-Code_Aster coupling. Run runFluid.sh and runSolid.sh in two separate terminals to start the coupled simulation.
The runFluid.sh prepares and runs the OpenFOAM case, as described in the respective OpenFOAM-OpenFOAM tutorial. The runSolid.sh scripts starts Code_Aster:
as_run --run solid/solid.export
There are two methods to visualize the results for Code_Aster:
- Salome-Meca is a intergated graphical interface, which also offers a post-processing unit called ParaViS (based on ParaView). The nice thing about ParaViS, is that it can open both the results of OpenFOAM and Code-Aster at the same time. Please make sure to have salome-meca 2018 or newer, as the med files are not compatible with older versions. Before installing Salome-Meca, please make sure that the environment on your system uses Python 2.7 (see the respective Salome-Meca issue).
-
GMSH is a stand-alone visualization tool that can open files of
medformat. Please make sure to get a version that is compatible with med 4.0 (GMSH 4.5 is known to work).
Firstly, enable the ParaViS view in Salome-Meca by selecting the icon in the top of the screen.
For visualizing the results of the fluid solver, go to File -> Open ParaView File and select Fluid.OpenFOAM. If you're asked to choose a reader, please select OpenFOAMReader and press click Apply to visualize the result.
For visualizing the result of the solid solver, press again Open ParaView File and select the output-..rmed group. Again, click Apply to visualize the result. After setting the temperature scale for both domains to 300-310 K, the following result is given for timestep 200:

Clone this repository, and generate a solid.export file by exporting the solid.astk file as an export file in ASTK. Then open two terminals and navigate to the buoyantSimpleFoam-aster/ folder. In here run ./runSolid.sh in one terminal, and ./runFluid.sh in the second terminal.
More information on precice.org. Subscribe to the preCICE mailing list.
This work is licensed under a Creative Commons Attribution-ShareAlike 4.0 International License. Please use "precice.org" for the attribution.
