This is the short path to setting up your system. Some steps are optional, this guide is trying to give the full advantages, through a shortcut: You'll download a fully functional Raspberry Pi image, compatible with Raspberry Pi A, A+, B, B+ and even the Raspberry Pi 2 available since February 2015
Some computer knowledge is required, but google can help you a lot, if you're in trouble with the below.
While having the raspberry pi near a computer monitor and a regular computer with internet access, you can prepare the setup in a simple manner:
Here's an old link to an 4 GB image http://goo.gl/O41CVn Beware that not all 4 GB cards have same capacity, so consider using a bigger card. Actually, find an 8 GB card now, and avid meddling with command lines like
dd if=..\backuprpifeb2015.img of=..\bk2.img bs=512 count=7800000
The image works on Rasberry Pi 1 and 2, I doubt you will have good results with a Raspberry Pi 3, 4 or 5, they require the manual installation here: https://github.com/solmoller/eversolar-monitor/blob/wiki/Software_installation.md
After you have downloaded the image, upzip it. Download and install a tool to write image files like this one http://sourceforge.net/projects/win32diskimager/
Mount the SD card in your computer Start the image tool, point it to the SD card and the unzipped image file, and write the file to the card. The image file is currently requiring an 4GB (or better 8GB) card. Shrinking the image is possible, but it requires expertise. If you use a bigger card, you can expand the filesystem quite simply, google will help you solve that issue.
Put the card into your raspberry pi, connect to your network, and preferably a monitor, and power up the pi.
Your username is pi
Your password is raspberry
Start the window manager with startx
Now a graphical userinterface should load On the right hand side of the background the ip address is listed. It's probably something like 192.168.1.10. If you have a wifi dongle attached to your Raspberry Pi you may have to look into the Wifi manager that comes with the image to find the IP address.
Make a note of the ip address, you'll need the address to connect to the system with a web browser and see todays production.
More importantly, when you know the ip address you will be able to remotely operate the Raspberry.
Ok, you now have a running system, that can connect to your solar cell inverters. All you need to do is to set it up to connect to the supported internet portals or use the built in webserver to monitor the solar production.
Move the Raspberry to your solar cell system. Connect it to the serial port and the network (or connect it to the network that is connected to your ethernet-to-serial port). No monitor, keyboard or mouse is required on the Raspberry Pi device.
On a windows computer, find remote desktop, or run mstsc.exe Type in the ip address you noted before, and log on the Raspberry. You can now remotely manage the system.
What remains now is to setup the ini file.
There is a browser icon next to the menu button at the top. Click it, and navigate to eversolar-monitor. Open the file eversolar.ini
The logging is controlled by the file eversolar.ini, this is how you should set it up. Most settings should be left unchanged, the typical changes are listed in bold below
[options]
query_inverter_secs = 10		# how often to request data from the inverter and write to log file
debug = 1				# Debug level , 0 = none, 1 is high priority, 3 is everything, also output packets sent to and received from the inverter
log_file = "/var/log/eversolar"		# make sure the user executing the script can write to this file
communication_method = "serial"	# "eth2ser" or "serial". defines wether you are using an ethernet to serial converter to connect to the inverter, or just a serial port
strings = 1      # number of PV panel strings (panels wired together) connected to your inverter. 1 or 2 supported.
Communication_method is to be set, depending on what hardware you use to connect to the inverters
Strings is one for Eversolar TL 2000 and below, it is 2 for TL 3000 and above. If you have a TL 3000 or above with just one string attached, strings is still to be set to 2. Newer Zeversolar 3000 may have changed firmware and require strings = 1, ZL2000S is strangely requiring strings = 2.
[eth2ser]				# communication_method must be set to "eth2ser" above for ethernet to serial devices
ip_address = "192.168.2.1"
port = 23
If you use a ethernet-to-serial adapter, here is where you instruct the software how to connect
[serial]				# communication_method must be set to "serial" above for serial comms
port = "/dev/ttyUSB0"
ttyUSB0 is the standard USB port on a Raspberry Pi
[pvlog]				# upload generation to pv-log.com
enabled = 1
FTPServeradresse = "ftp.pv-log.com"
interval = 1		        # 5 minutes, interval between logs - beware, pv-log is sluggish and only updates once per hour
username = "idxxxx"             # taken  from pv-log settings
Password = "0hxxxxx"
The PV-log section is to be modified if you wish to upload to pv-log.com.
To find pv-log.com api and password, go to 'my profile' and find the API key Under Automatic data import, set it to
Data logger company    :     Other manufacturer/own construction
Data logger model      :     Datenformat Solarlog
Transfer type          :     FTP
Username and password is not your normal logon credentials to pv-log, they are to be read out from this place on pv-log.com's web page.
[pvoutput]				# upload generation to pvoutput.org
enabled = 1
api_key = "99ccfxxxxxxxxxxxxxxxxxxxxxxxxxxx2"
status_interval_mins = 5		# 5 or 10 minutes, depending on your pvoutput.org setting
add_status_url = "http://pvoutput.org/service/r2/addstatus.jsp"
# duplicate the next line if you have multiple inverters and replace the serial numbers with your inverter serial numbers and the matching pvoutput system ids
system_id B882000A127D0 = 99999 # system_id inverter_serial_number = pvoutput_system_id
system_id B882000A127D0 = 99998 # system_id inverter_serial_number = pvoutput_system_id
The pvoutput section is to be modified if you wish to upload to pvoutput.org.
Under "Account settings" in Pvoutput enable "API Access", api_key can then be found in your settings and copy pasted to the ini file.
System_id lines are setting up serial numbers vs pvoutput system id's, the ini file has two examples to modify. This enables the solution to ensure that the proper serial number is mapped to the same pvoutput.org system each time.
In addition you might want to use pvoutput.org's team function to team up your individual systems, enabling reporting of total production on their web page, this can be done for free on the web page, despite descriptions that imply that it is not possible.
[seg]					# upload generation to smartenergygroups.com
enabled = 0
upload_interval_mins = 1
site_id = "site_1234abcd"
device = "solar"			# device name
power_stream = "p"			# stream name for power stream
energy_stream = "e"		# stream name for energy stream
api_url = "http://api.smartenergygroups.com/api_sites/stream"
Setting up upload to smartenergygroups.com
site_id is found on smartenergygroups.com in your profile
[web_server]
enabled = 1
port = 3837
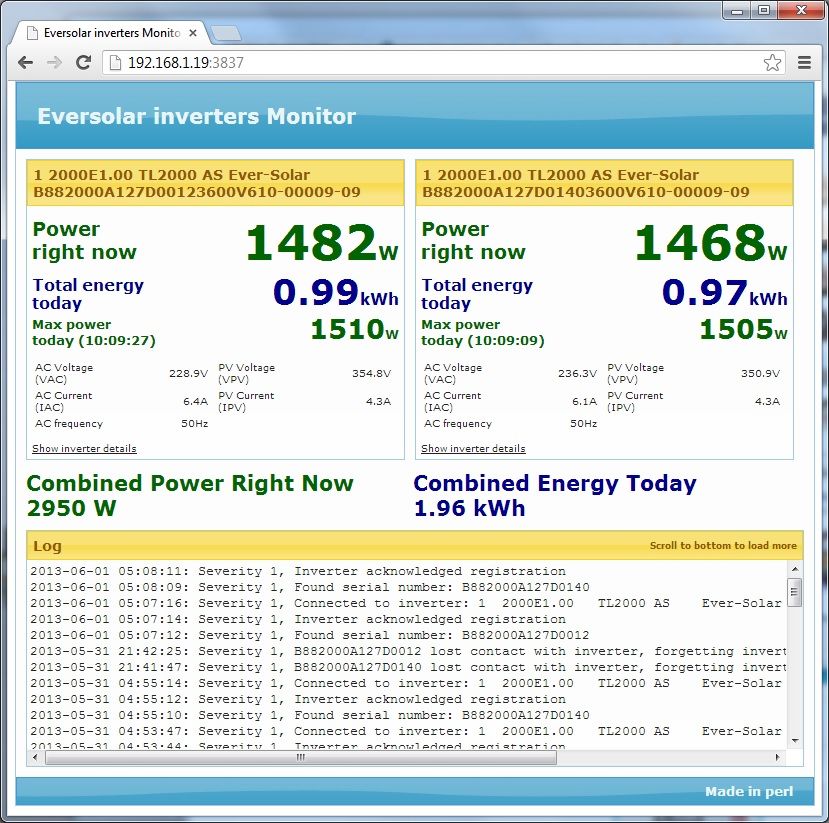
The web server is reachable from your computer, and normally it can only be reached as 'ip of computer':3837, typically something like http://192.168.1.10:3837
If you want to be able to reach this web page from the internet, you have to have IPV6 and port forwarding. The script needs some modification as well:
@@ -176,8 +177,8 @@ if($config->web_server_enabled) {
{
package SolarWebServer;

- use HTTP::Server::Simple::CGI;
- use base qw(HTTP::Server::Simple::CGI);
+ use HTTP::Server::Simple::CGI::PreFork;
+ use base qw(HTTP::Server::Simple::CGI::PreFork);
use JSON;
use File::Basename;
You will have to install HTTP::Server::Simple::CGI::PreFork, it is recommended to use CPAN for this.
The web page looks something like this
Reboot the raspberry pi, the system should automatically start
Let us improve these pages, and let other people know how easy or troublesome your installation went through the Feedback page.