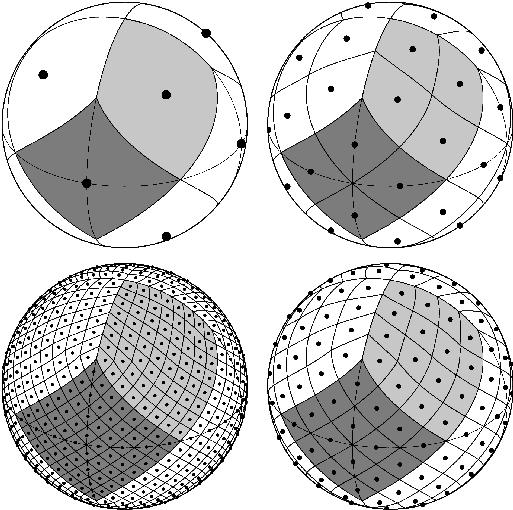
This Project Pythia Cookbook covers an introduction to the Hierarchical Equal Area isoLatitude Pixelation (HEALPix) of the Earth and utilization of easy.gems and UXarray to run data analysis and visualization functionality on HEALPix data sets.
Driven by The 2025 World Climate Research Programme (WCRP) Digital Earths Global KM-scale Hackathon taking place 12-16 May, a need for exploring HEALPix and documenting HEALPix-based workflows that utilize community resources such as the easy.gems documentation and UXarray software tool has emerged. Project Pythia Cookbooks are a great medium to publish such documentation in an accessible, reproducible, and citable manner, which can benefit not only the 2025 event but also future collaboration efforts and similar events.
Orhan Eroglu, Philip Chmielowiec, Andrew Gettelman, John Clyne
This cookbook is broken up into a few sections as follows:
Here, we cover basic information about HEALPix necessary to understand the topics throughout the cookbook and provide a lot of links to the resources in order to learn more about HEALPix.
This section provides examples of how to load in HEALPix data, use healpix package for basic HEALPix
statistics use easygems package's convenience functions to plot the data with matplotlib.
This section walks the reader through loading in and performing basic analysis and visualization on HEALPix data using UXarray.
This section will cover advanced UXarray functionality such as remapping, zonal means, cross-sections, etc.
This section is currently under construction, but once complete, we hope to provide some practical guidance
on what cases either of easy.gems or uxarray can provide helpful functionality and would be a
ideal choice.
You can either run the notebook using Binder or on your local machine.
The simplest way to interact with a Jupyter Notebook is through
Binder, which enables the execution of a
Jupyter Book in the cloud. The details of how this works are not
important for now. All you need to know is how to launch a Pythia
Cookbooks chapter via Binder. Simply navigate your mouse to
the top right corner of the book chapter you are viewing and click
on the rocket ship icon, (see figure below), and be sure to select
“launch Binder”. After a moment you should be presented with a
notebook that you can interact with. I.e. you’ll be able to execute
and even change the example programs. You’ll see that the code cells
have no output at first, until you execute them by pressing
{kbd}Shift+{kbd}Enter. Complete details on how to interact with
a live Jupyter notebook are described in Getting Started with
Jupyter.
Note, not all Cookbook chapters are executable. If you do not see the rocket ship icon, such as on this page, you are not viewing an executable book chapter.
If you are interested in running this material locally on your computer, you will need to follow this workflow:
-
Clone the
https://github.com/ProjectPythia/healpix-cookbookrepository:git clone https://github.com/ProjectPythia/healpix-cookbook.git
-
Move into the
healpix-cookbookdirectorycd healpix-cookbook -
Create and activate your conda environment from the
environment.ymlfileconda env create -f environment.yml conda activate healpix-cookbook
-
Move into the
notebooksdirectory and start up Jupyterlabcd notebooks/ jupyter lab


