


- Register to participate in the live stream or watch the replay: https://www.crowdcast.io/e/bsok-bootcamp/
- Create your free IBM Cloud account at https://ibm.biz/bsok-series
- Red Hat OpenShift Cluster
- URL: https://bsokbootcamp.mybluemix.net/
- Key: oslab
- Create Project & Deploy frontend app
- Install IBM Cloud Operator from Operator Hub
- Create a Cloudant service
- Deploy new application back-end
- Configure Application to Use Cloudant
In this exercise, deploy a simple Node.js Express application - "Example Health". Example Health is a simple UI for a patient health records system. We will use this example to demonstrate key OpenShift features throughout this workshop. Deploy Example Health
-
Launch the OpenShift web console, if not already running. You should still have a browser tab open with the OpenShift web console from the previous exercise. We will use the web console for this exercise. If you closed that tab, you can access your OpenShift web console on via ##OPENSHIFT.dashboardUrl##.
-
Use the Developer perspective. If you are currently in the Administrator perspective, switch to the Developer perspective.

You may be prompted with a "Welcome to Dev Perspective!" tour dialog, if so, click the "Skip tour" button. -
While on the Topology page, click the create a project link.

-
Enter "example-health" as the new project's Name. example-health Optionally specify a Display Name and Description.

-
You should see a view that looks like this.

-
Let's deploy the application by selecting the From Git tile.

-
In the Git Repo URL field, enter:
https://github.com/IBM/ibm-dte-openlab-samples
- Press the tab key to validate the repository path. Note: If you receive an error regarding invalid repository, make sure you do not have any trailing spaces in the repo field. You can ignore the "Unable to detect the builder image" message, we will fix that in the next step.
- Click Show Advanced Git Options.
- Enter /Red Hat OpenShift on IBM Cloud/node-s2i-openshift-master/ in the Context Dir field.
Red Hat OpenShift on IBM Cloud/node-s2i-openshift-master/
Note: there is a leading "/" already in the entry field. If you copy from the lab guide, click in the field and do a paste or control v, the correct value will be: "/Red Hat OpenShift on IBM Cloud/node-s2i-openshift-master/".

-
Scroll down and select the Node.js tile under Builder Image.

-
Scroll down and change Application Name to
patient-uiand Name tonode-s-2-i-openshift.
patient-ui
node-s-2-i-openshift
Note: These values are used later in this lab as well as Lab 2. If you change these names, remember the values and make appropriate changes in the subsequent steps.

-
Click Create at the bottom of the window to build and deploy the application. Your application is being deployed. This takes a few minutes. While it is being deployed, you see the state icon of your application change:

-
Once the application has been completely deployed, the bottom icon changes to a green check mark. Note: During the build process, OpenShift will register 2 or 3 image pull errors. The application should successfully deploy within a couple of minutes. If it does not, review the logs and events as described in subsequent exercises in this lab, or delete the application from your topology and deploy it again making sure to specify the information exactly as described in this lab guide.

-
Click the Node.js label in the graphic. A panel like below is displayed.
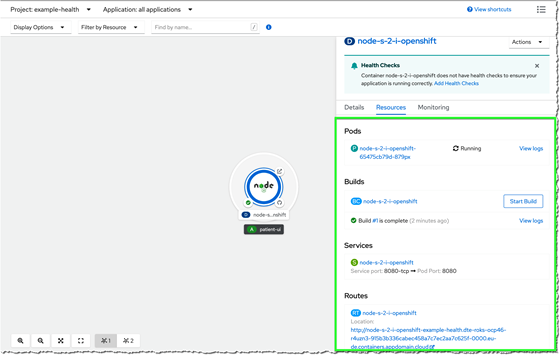
This panel displays the details about your Pods, Builds, Services and Routes. Note that Build #1 should be complete. If it is not yet complete, wait until it changes to the complete state (green check mark) before continuing.
- Pods: the Node.js application containers
- Builds: auto-generated build of Docker image from your Node.js source
- Services: access to pods and listening ports
- Routes: exposed service route using LoadBalancer provided by IBM Cloud network