
This "All about Angular"-repository catches up its focus on all the Projects and Excercises I've made with Angular through the years as a SAE-Web Development student with exercise lessons every week as well as tutorial videos on Youtube.
-
Direct Link to the place where I'm studying are you going to find HERE
-
Kevin Kreuzer, one of the Angular experts beside Tomas Trajan on YOUTUBE
-
ANGULAR BLOG from Tomas are you going to find HERE
-
ANGULAR TALKS from Tomas are you going to find HERE
-
ANGULAR EXERCISES from Tomas are you going to find HERE
-
Presentation Nr.1 is able to watch with a CLICK OVER HERE
-
Presentation Nr.2 is able to watch with a CLICK OVER HERE
| Topic | Content |
|---|---|
| 01_Typescript | Basic Usage of Typescript |
| 02_Angularproject | my-first-project: Hamsterbook |
1) Node.js - INSTALLATION: (Used for runtime environment for Javascript, script performs directly on the computer and not just on a web browser)
- https://nodejs.org/en/ (Recommend LTS = Long Term Support for an unbuggy / non-risky experience)
- Open BASH or CMD or POWERSHELL to check with node --version if you installed it correctly
- Node works via the command lines and is not executed via graphical components.
- Together with NODE we also get the tool "Node Package Manager" = software can be installed via the command line!
2) Angular - INSTALLATION: (Our CLI: Command Line Interface - A CLI is needed to generate new components)
- https://angular.io/cli (npm install -g @angular/clie)
3) VSC and CHROME (Code Editor and Webbrowser)
- Chrome is recomended because of the close origin of Angular by Google
- Other options are codesandbox.io or stackblitz.com to work with Angular directly in the browser. But Visual Studio Code is the best option because of the many extensions and the possibility to work with GIT.
OPT) NODEMON - INSTALLATION:
- https://www.npmjs.com/package/nodemon
- (Nodemon is a tool that helps develop node.js based applications by automatically restarting the node application when file changes in the directory are detected).

Angular = Javascript Framework ("vorprogrammiertes Programmiergerüst / Rahmenstruktur")
Typescript = Javascript Extension "Erweiterung" (Superset)
WHY SHALL I USE ANGULAR?
- Provides components to effectively connect to the server or increase compatibility
- Scripts are already available (safe time) and here to simplify the programming process
- Other well-known Javascript frameworks are React and View
- Provides a variety of libraries (code libraries) -> Material Design for graphical components
- Built and used by Google = support is guaranteed
- Patterns are used to simplify the programming process, it is performant and scalable
WHY DO WE USE TYPESCRIPT?
- This programming language is almost the same like Javascript, but it is an EXTENSION with some advantages
- Everything which can be written in Javascript is also possible with Typescript
- Old web browsers may not be able to read the constantly updated Javascript codes. Typescript remains at a rustic level, but at the same time we also write modernised Javascript
What's the difference between NULL and UNDEFINED? (Table in GERMAN)
| NULL | UNDEFINED |
|---|---|
| Bedeutung: Zuweisungswert = KEIN WERT! (var = no value) | Bedeutung: Variable wurde DEKLARIERT, aber noch nicht DEFINIERT / ZUGEWIESEN |
| In Javascript: Werte werden niemals auf null gesetzt | In Javascript: Als Standardwert festgelegt |
| In JSON: Gültiger Wert | In JSON: Ungültiger Wert |
| Element: Grundelement | Element: Grundelement |
| Typ: Objekt (Fehlen dessen Wertes) | Typ: Undefined (Globale Variable) |
| Prüfen: variable === null // true or false | Prüfen: variablenwert === undefined // true or false |
What's the MEANING OF THE DEFAULT PACKAGING FOLDERS in ANGULAR?
- node_modules = All additional external Libraries used for our Angular Project (Lots of default libraries)
- src = IMPORTANT: Source for all the code we're typing over there (more folders will be added through the work) into the app folder
- app = Components for the page (With Import and Export we generate dependencies and add only the content we need)
- app-routing.module.ts = All the URL of our page to call these later (Like /# or /register)
- app.component.html = HTML Code
- app.component.scss = SCSS Code
- app.component.ts = TTypescript / Javascript Code
- app.module.ts = Declared Components (out of our app-folder) and imported modules
- assets = IMPORTANT: Safe images, videos and sounds
- environment = Keep informations which may change: API keys, infos to our webapp like server URL changes
- index.html = FIRST OPENING FILE and binds the
<body>-part from app.component.html - main.ts = Configurations (Imports the first module, the AppModule) - Dont have to be changed!
- polyfills.ts = Compability - Dont have to be changed!
- styles.scss = Basic styles for our application (INSERT CSS CODE HERE)
- test.ts = Configurations for TESTING our application - Dont have to be changed!
- app = Components for the page (With Import and Export we generate dependencies and add only the content we need)
- .browserlistrc = List of Webbrowser Output Support to show HTML, CSS and JS
- .editorcofig = Configuration of our Code Editor VSC
- .gitignore = All the data which shouldn't shown in .git
- angular.json = Angular Project Configuration
- karma.conf.js = Testrunner (To automatically test our Webapp)
- package-lock.json = Overview of installed Libraries and Versions
- package.json = Overview of the Package-libraries which have to be installed into node_modules
- README.md = Basic instructions to initialize a project
- tsconfig.json = Here to define which Javascript version we would like to convert our Typescript and typescript tests
(IMPORTANT: src is the most used folder here, in general you keep the others unattached)
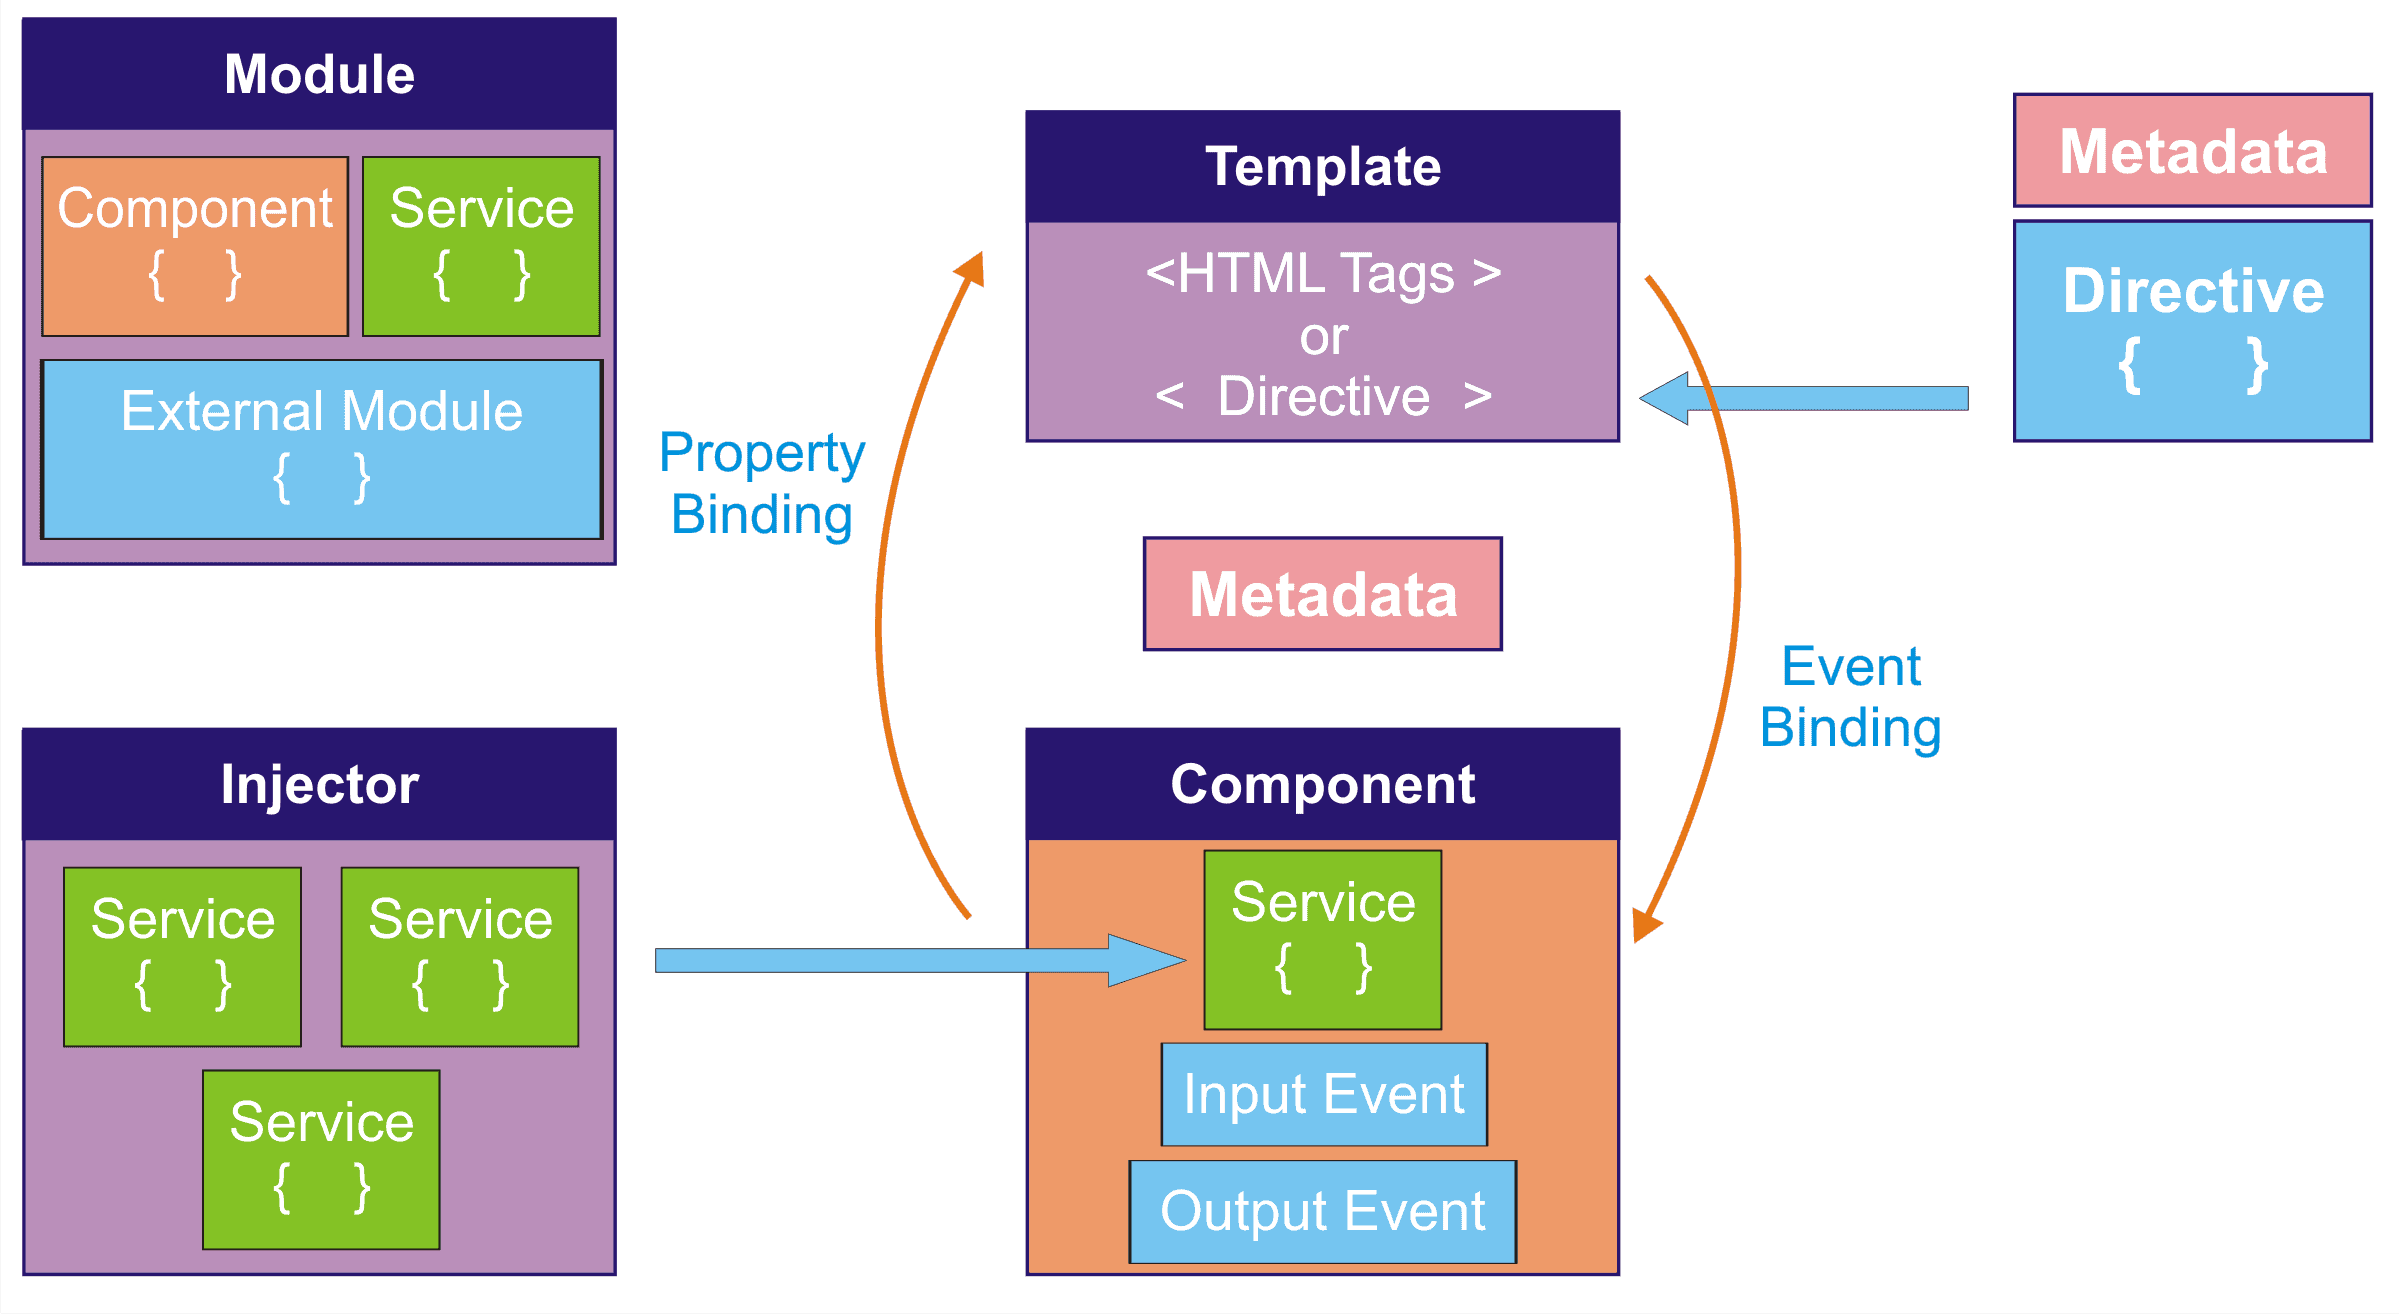
Components = Components are the most basic building block of an UI in an Angular Application. An Angular application is a tree of Angular Components. Angular Components are defined by @Component decorator and a class. The class contains properties and methods, which are defined in the component's template. The template is a HTML view where you can display data by binding controls to properties of the component. You will call them like "HeaderComponent" or "FooterComponent" and they are reusable.
BE SURE to CHECK OUT 00_ImagesForHelp to get a better understanding!
Input and Output Parameters = We want to display different content elements and not, for example, the same element 10 times. For this we use input and output parameters. Input parameters are the data we put into our component and output parameters are the data we get out of our component. We can put variables in and out of our component:
- Add the Add the {{ text }} variable to output:
<!-- (!) In AUSGELAGERTES: hamster-card.component.html -->
<div class="card">
  <img src="assets/img/hamster/1.jpg" alt="">
  <!-- 1. Add the {{ text }} variable to output it over here -->
  <p> {{ text }} </p>

  <button>Like</button>
  <button>Message</button>
</div>- Then define the content of this {{ text }} variable within the .TS Typescript component:
// (!) In AUSGELAGERTES: hamster-card.components.ts
export class HamsterCardComponent implements OnInit {
  // 2. Add the input and constructor, our datatype is string ()
  @Input() text: string = '';
  constructor() { }

  ngOnInit(): void {

  }
}- Pack the text into a variable and pass it to the component in the typescript:
<!-- (!) In der URSPRUNGS-App-Component: app.component.html -->
<app-header></app-header>

<div class="container">
  <app-hamster-card [text]="postTexts[0]"></app-hamster-card> <!-- Define the variable here -->
  <app-hamster-card [text]="postTexts[1]"></app-hamster-card> <!-- Define the variable here -->
</div>- In the app.component.ts, give the variable a value, in our case in the form of text as an array:
// (!) In der URSPRUNGS-App-Component: app.component.ts
import { Component } from '@angular/core';

@Component({
  selector: 'app-root',
  templateUrl: './app.component.html',
  styleUrls: ['./app.component.scss']
})
export class AppComponent {
  // Add the textcontent here as a array:
  postTexts = [
    'Hello Hamster World',
    'Hello everyone!'
  ]

}

// Ausgelagert: (Damit ist die dafür neu erstellte Komponente gemeint)NgFor = ngFor is a structural directive, meaning that it changes the structure of the DOM. Angular uses this directive to create a list of elements and to repeat through the list. The ngFor directive iterates over the array.
- BEFORE:
<!-- (!) In der URSPRUNGS-App-Component: app.component.html -->
<div class="container">
  <app-hamster-card [img]="postImages[0]" [text]="postTexts[0]"></app-hamster-card>
  <app-hamster-card [img]="postImages[1]" [text]="postTexts[1]"></app-hamster-card>
  <app-hamster-card [img]="postImages[2]" [text]="postTexts[2]"></app-hamster-card>
  <app-hamster-card [img]="postImages[3]" [text]="postTexts[3]"></app-hamster-card>
</div>- AFTER:
<div class="container">
  <app-hamster-card *ngFor="let i of [0,1,2,3]" [img]="postImages[i]" [text]="postTexts[i]"></app-hamster-card>
</div>
<!-- As you can see we dont use postImages[1] etc anymore, we iterate into "i" -->Service = Ist eine weitere Datei, in der wir Daten hinzufügen und speichern. So können wir diese in einer anderen Komponente aufrufen. Das Prinzip, was angewendet wird, ist das "Dependency Injection" (DI). Das bedeutet, dass wir eine Instanz von diesem Service haben, der in einer anderen Komponente verwendet werden kann. Wir können also Daten in einem Service speichern und diese in einer anderen Komponente aufrufen.
xxx
| STEP | COMMAND | EFFECT |
|---|---|---|
| 1 | $ node --version | Checks the node.js version (None if you havent installed it) |
| 2 | $ npm --version | Checks the NPM Version (Node Package Manager) |
| 3 | $ npm install -g @angular/cli | Command to Install Angular CLI (Command Line Interface) |
| 4 | $ npm install -g typescript | Command to Install Typescript |
| 5 | $ ng --version | Checks the NG Version (Angular Version) |
| 6 | $ ng update | Shows which packages you could update to run the latest versions |
| 7 | $ ng update @angular/cli | BUT: First: Uninstall > Then: $npm cache verify command > Then: $npm install -g @angular/cli --- Updates the CLI-packages |
| 8 | $ ng update @angular/core | Updates the core-packages |
| 9 | tsc script.ts | TSC = Typescriptcompilation = Compiles the Typescript File script.ts to Javascript in script.js (only JS is readable for a browser) |
| 10 | (...move on...) | 1) Use Trick 17 to be in the right path = Right click of your desired file in your explorer > "OPEN IN INTEGRATED TERMINAL" > 2) Initialize Angular to the project with the NAME you want, for this example we use "my-first-project", the step next step will do this: |
| 11 | $ ng new my-first-project | Initializes your Project with a PRE DEFINED WORKSPACE |
| 12 | (...move on...) | 3) y to accept routing for multiple subpages > 4) Choose Design language (like SCSS) > Installing small libraries (packages) > 5) Puts in all the packages to your "my-first-project"-folder (Component Architecture) > 6) OPEN in integrated folder (in this example at "my-first-project") |
| STEP | COMMAND | EFFECT |
|---|---|---|
| 0 | Folder Check | Be sure to open up in the correct integrated terminal to continue the process |
| 1 | $ ng serve --open | Starts our project and opens at default port: localhost:4200 - The Content you see in your browser is from app component - ctrl + S to safe will activate auto load (If you only write "ng serve" you have to open it manually by clicking the localhost link in the terminal) |
| 2 | (...move on...) | Open a NEW TERMINAL in the same folder, so it can run independetly and now add some MORE COMPONENTS (which work like INCLUDES in PHP) |
| 2.1 | ctrl + c | OPTIONAL: Stop localhost for a brake |
| STEP | COMMAND | EFFECT |
|---|---|---|
| 1 | $ ng g c header | Generates a new Angular component called "header" in the src > app-folder with multiple files like .html .css .ts and testfile called spec.ts |
| STEP | COMMAND | EFFECT |
|---|---|---|
| 1 | $ ng g s friend | Generates a new Angular service called "friend" below the app.component starting folder! (Services are used to store data and use it in other components) |
| STEP | COMMAND | EFFECT |
|---|---|---|
| 1 | $ ng add @angular/material | Go to their website (like Bootstrap and Angular Material). In the "How to get started" site |
| you will find the starting guide |
- Create new Angular workspace
- Learn how to use Angular schematics
- Create application in the workspace
- Run the application (and options)
- Build the application (and options)
- Test the application (and options)
- Analyze the application
- Explore workspace configuration
- Add Prettier support
- Remove default placeholder content
- Add Angular Material component framework
| COMMAND | EFFECT |
|---|---|
| $ ng new my-first-project --create-application false --style scss | Initializes your Project with a CUSTOM WORKSPACE |
CONST vs LET vs VAR:
/* ---- ALWAYS USE CONST and LET to guarantee to work with BLOCK-SCOPE ---- */

<script>
function foo() {
  if(true)  {// FUNCTION SCOPE - START | BLOCK SCOPE - START
    var heroOne = 'Iron Man'; // Functionscope
    let heroTwo = 'Superman'; // Blockscope (console.log is in the wrong scope)
    const heroThree = 'Batman';// Blockscope (console.log is in the wrong scope)
  }                           // BLOCK SCOPE - END
  console.log(heroOne); // 'Iron Man'
  console.log(heroTwo); // 'heroTwo is not defined'
  console.log(heroThree); // 'heroThree is not defined'

}// FUNCTION SCOPE - END

foo();
</script>Feel free to contact me if you've seen something wrong, found some errors or struggled on some mistakes! Always happy to have a clean sheet here! :)
0 Questions have been asked, 0 answers have been given, 0 changes have been made.
| Questions | Anwers | Changes |
|---|---|---|
| 0 | 0 | 0 |