Advanced Guides


MainUI offers the possibility to create a kind of collections of games called "Best".
CrossMix includes "Best Demo Collection" which is a perfect example to create your own multisystem Best collection.
It includes an universal script which will find the right emulator depending the sub-folder where is located the rom.
This universal script also supports rom shortcuts: you can create a simple text file containing a target rom path. VB Racing in "Best Demo Collection" is a good illustration.
You can easily use the "Best Demo Collection" folder as template to create your own collection:
- Duplicate the
SDCARD/Best/Free Games Collectionfolder and rename it (in this example we'll take "My Best Games") - Edit the label in
SDCARD/Best/My Best Games/config.jsonwith "My Best Games" - Put your Roms in
SDCARD/Best/My Best Games/Roms/[SYSTEM]whereSYSTEMis the same name as the official rom folder corresponding to this rom. (for SNES for example it will beSFC). It's key sensitive and the folder name will be use to determin which emulator should be used. - If you don't want to duplicate existing roms from your Roms folder then you can use shortcuts as mentioned above.
- Restart your device or MainUI
CHD are probably the best way to store your PSX games: this file format is compressed but not destructive.
This procedure explains hox to convert your cue + bin files to chd:
- Extract chdman 0.251 anywhere.
- Put your CUE/BIN images to the "chdman" folder.
- Click on "cue2chd" and wait for it to finish.
- Copy the resulting .chd files to the rom folder.

Official TrimUI Toolchain:
Shaun (minUI) Toolchain:
s0ckz toolchain:
PortMaster toolchain:
Golang Trimui Smart Pro Toolchain:
- Add the core lib file (.so)
- Add the core info file (.info)
- Create Emulators launcher
- Create Rom folder
- Create the Imgs folder
- Create a core override (with max-ratio overlay)
- Generate the overlays config files (/RetroArch/.retroarch/overlay/_overlays_generator.sh)
- Add the corresponding overlays (i.e. RetroArch/.retroarch/overlay/DAPHNE_max-ratio.png)
- Add Emu icons for each icon pack
- check if the corresponding logo exists in Icons\Default\Logos (will be used for scraper emulator images and for folders images on free games)
- Add backgrounds for each background pack
- Update core_folders.csv with core config path (will be used to find "directory override" in subolfolders (FolderOverrideFinder.sh))
- Update emulator database: SDCARD\System\usr\trimui\scripts\emulators_list.db (will be used to rename emu labels in System Tools)
- run _assets\scripts\gitkeep_generator.ps1 (to keep empty folders in Github)
- Document this new emulator in wiki emulators section (in table and in detailed description below the tables)

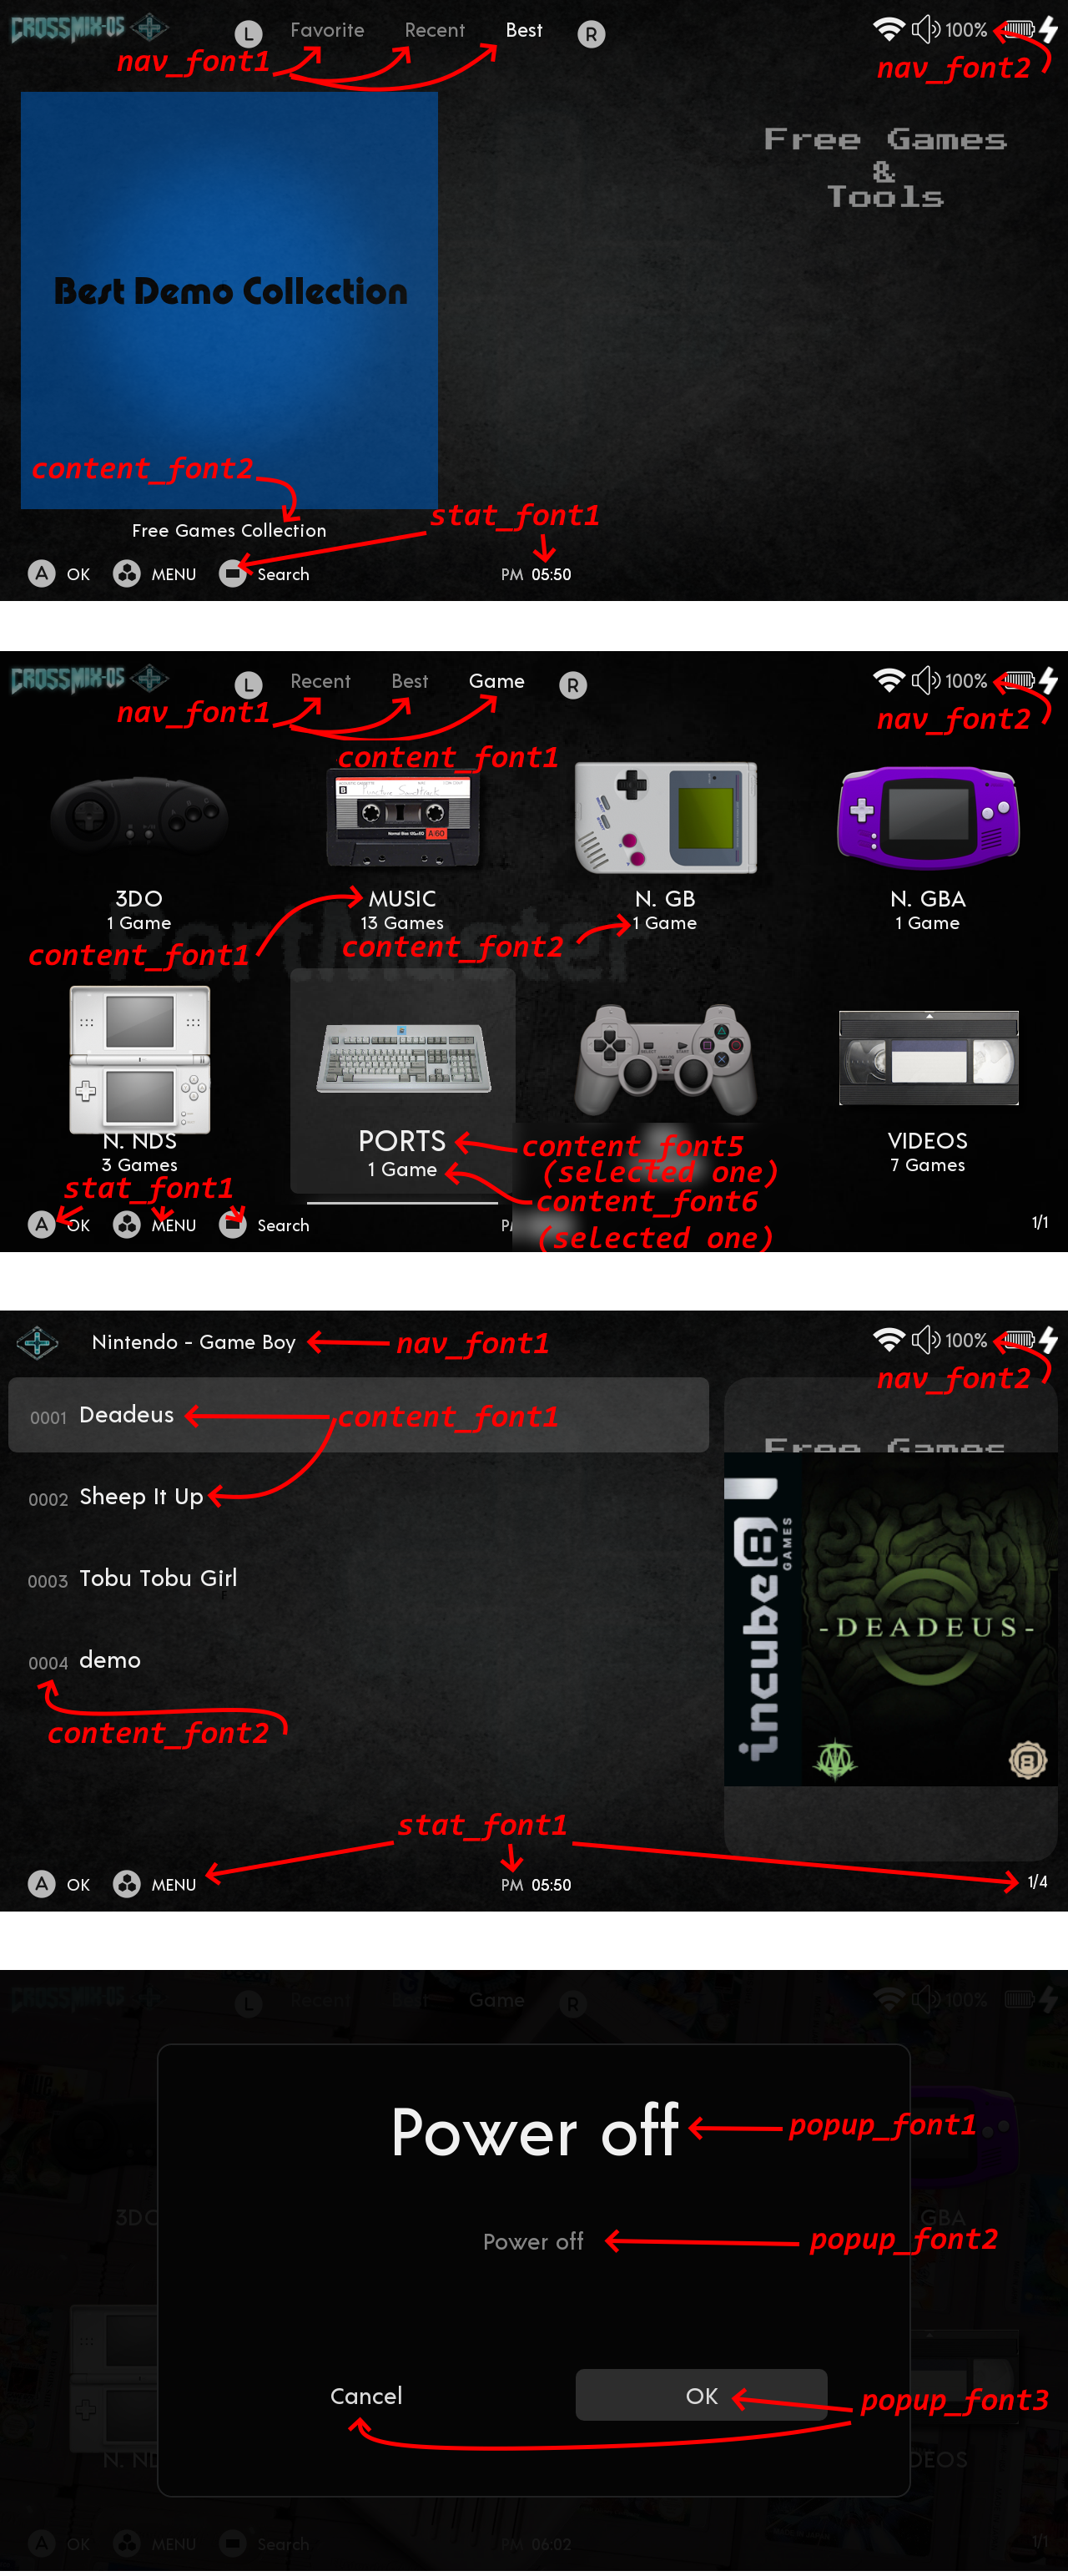
Here you'll find a description of the different fonts used in the config.json of each theme:
Adding a new Icon Pack in CrossMix it's really simple: add your icon folder and refresh "System Tools" menu, that's all ;)
Detailed steps:
- Create a new subolder in "Icons" folder, for example you'll have
SDCARD/Icons/My new Icon Pack/Emus - Copy all your new icons in it and create a
preview.pnginSDCARD/Icons/My new Icon Pack - Then go in
System Tools->USER INTERFACE->Refresh System Tools Menu - You'll find your new pack in
System Tools->THEME->ADVANCED SETTINGS->ICONS
Adding a new Background Pack in CrossMix it's really simple: add your background folder and refresh "System Tools" menu, that's all ;)
Detailed steps:
- Create a new subolder in "Backgrounds" folder, for example you'll have
SDCARD/Backgrounds/My new Backgrounds Pack - Copy all your new backgrounds in it (one per emulators in uppercase) and create a
preview.pnginSDCARD/Backgrounds/My new Backgrounds Pack - Then go in
System Tools->USER INTERFACE->Refresh System Tools Menu - You'll find your new pack in
System Tools->THEME->ADVANCED SETTINGS->BACKGROUNDS
- Create a new .bmp file in SDCARD/Apps/BootLogo/Images
- The max resolution is 720p (1280x720). Smaller resolution is OK, more will stop the flash process
- Check if the file size is inferior to 6MB
- The bmp file must be in 24 bit depth to avoid bootlogo corruption
- Run the "BootLogo" application.
Example of .bmp file in 24 bit depth when saved with paint.net:

Theme packs are simple config files which allows to configure many graphical aspects in one click from "System Tools" app.
A Theme Pack is a selection of:
- a packname: used for system icon, for apps assets such as infoscreen, system tools, user guide, Windows SD card icon
- a theme: used to apply theme but also for SDL2image font
- a bootlogo: Pick a bootlogo file from "Apps/BootLogo/Images/"
- an icon: name of the folder which contains the desired icon collection
- a background: name of the folder which contains the desired background collection
- global style (for crossmix messages, help app, System Tools app)
- an emulabels: choose if you want to display Emulators labels or not (option not available currently)
Theme Packs are very easy to create: just create a new .sh file into SDCARD/Apps/SystemTools/Menu/THEME##THEME PACK SELECTOR/ with the variables mentioned below.
A Theme Pack looks like this.
So it's very easy to create, for example:
#################################################   THEME PACK CONFIGURATION   #################################################
# packname: Just a name to identify the current Theme Pack
# style: 2 styles available: "Default" and "CrossMix - Refreshed",
#        used for apps assets such as infoscreen, system tools, user guide, firmware wizard or Windows SD card icon.
# theme: Used to apply theme but also for infoscreen.sh font (use a folder name from /Themes).
# bootlogo: Pick a bootlogo file from "Apps/BootLogo/Images/", enter the name with the extension.
# icon: Name of the folder which contains the desired icon collection (use a folder name from /Icons).
# background: Name of the folder which contains the desired background collection (use a folder name from /Backgrounds).
# emulabels: Choose if you want to display Emulators labels or not.
#        use the label script name from "Apps\SystemTools\Menu\ADVANCED SETTINGS##EMULATOR LABELS (value)" (without extension).

packname="Burst!"
style="CrossMix - Refreshed"
theme="Burst!"
bootlogo="Burst!.bmp"
icon="Burst!"
background="Burst!"
emulabels="No names"

################################################################################################################################

. /mnt/SDCARD/System/usr/trimui/scripts/themepack_apply.sh
CrossMix-OS still has many overlays to implement. This tutorial will explain how to add overlays for a platform:
- Find a platform where overlays are missing
- To do this, go into
SDCARD/RetroArch/.retroarch/overlayfolder - Find a .cfg file where the corresponding .png files (with the same name) is missing
- For example if you SEGA32X_max-ratio.cfg but no SEGA32X_max-ratio.png it means that this overlay is missing.
- Run a game, if you have choosen a file suffixed with "_max-ratio.cfg" then integer scale must be OFF (you can toggle it in RetroArch menu:
Settings->video->Scaling) - Make a screenshot of your running game:
/mnt/SDCARD/System/bin/fb2png -p /mnt/SDCARD/$(date +'%Y%m%d-%Hh%M-%S').png - Create your overlay, thanks to the screenshot you can see if the screen displayed by the core fits with your overlay.
- Copy your overlay to
SDCARD/RetroArch/.retroarch/overlayand name it[Rom Directory]_max-ratio.png - Test it by enabling the "_max-ratio.cfg" in retroarch menu or just apply "overlays - max ratio" from
System Toolsapp ->EMULATORS->OVERLAYS
Note
If you don't see the .cfg file in overlay folder for your target emulator, then run a game on this emulator, make a new "Directory Override" and then run this script:
/mnt/SDCARD/RetroArch/.retroarch/overlay/_overlays_generator.shfrom SSH. It will generate automatically the .cfg files for this emulator.
| Previous: FAQ | Back to top | Next up: About |
|---|
