** Chapar Khaneh, is a Persian term for the postal service used during the Achaemenid era. The system was created by Cyrus the Great, the founder of the Persian Empire, as the royal method of communication throughout the empire. Each "Chapar Khaneh" was a station mainly located along the Royal Road, a 2500 km ancient highway, connecting most of the major cities of the empire. https://en.wikipedia.org/wiki/Chapar_Khaneh
Micro-service design can solve lots of development problems, yet a lightweight reliable and robust communication system is needed.
| Pros | Cons | |
|---|---|---|
| HTTP | Main web frameworks such as Express use this protocol. Every one is familiar with express. | HTTP 1.1 has lots of overhead in memory and connection usage. |
| Publish/Subscribe | Publish/Subscribe protocols are well-suited for high throughput data pipeline as they provide a lightweight communication layer. | Programmers have to change their code layout to use pub/sub. Specially they cannot use Express framework. |
Chapar helps you to use AMQP as underlying communication protocol with absolutely zero changes while coding Express/Node.js.
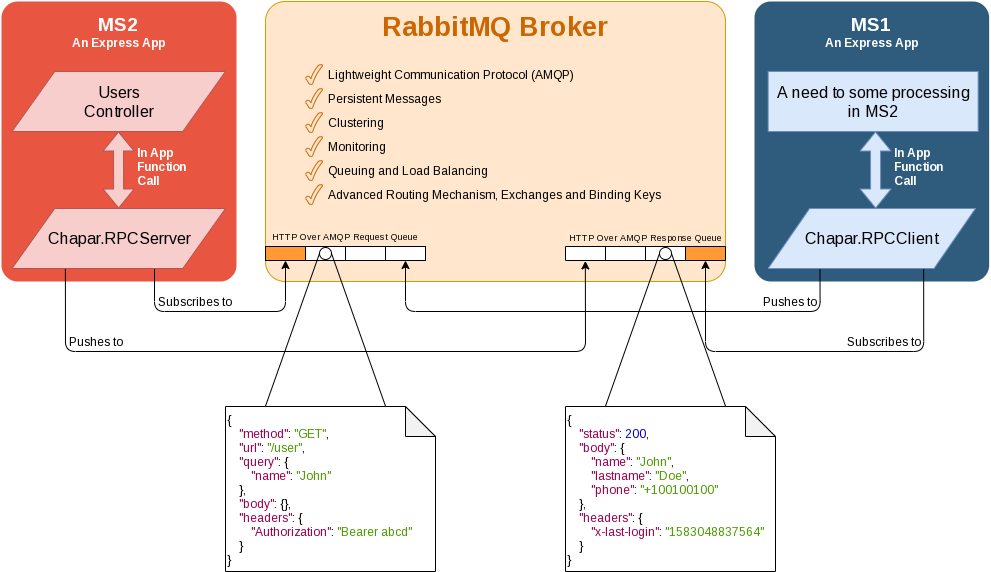
Suppose you have two micro-services in your production server, MS1 and MS2. MS1 has very high number of requests per seconds that needs to be processed by MS2. MS2 is a server for MS1.

You use Chapar.RPCServer middleware in MS2 and Chapar.RPCClient in MS1. In MS1 you call an Express route of MS2. Chapar.RPCClient creates a message with shape of actual HTTP request and sends it with AMQP with RabbitMQ broker.
This message pushes Chapar.RPCServer in MS2. MS2 calls the internal controller (only function call, no TCP handshake, no HTTP overhead), gets the result and sends the response back on a response queue. You just need to await for Chapar.RPCClient to provide you the response.
npm i -s chapar
Express app.js:
import express from 'express';
import {RPCServer} from 'chapar';

const app = express();

app.use('/', indexRouter);
// Other Express middlewares

const config = {
  rabbitMQ: { // required
    host: 'localhost', // required
    port: 5672, // required
    username: 'RABBITMQ_UESRNAME', // optional, (needed if rabbitMQ requires authentication)
    password: 'RABBITMQ_PASSWORD' // optional, (needed if rabbitMQ requires authentication)
  },
  exchange: { // required
    name: 'MY_APP_EXCHANGE_NAME', // required
    type: 'direct', // optional, default='direct'
    options: { // optional
      durable: true // optional, default='{ durable: true }'
    }
  },
  requestQueue: { // optional
    name: 'HTTP_OVER_AMQP', // optional, default='HTTP_OVER_AMQP'
    options: { // optional
      exclusive: false // optional, default={ exclusive: false }
    },
    bindKey: 'HTTP_OVER_AMQP_ROUTING_KEY', // optional default='HTTP_OVER_AMQP_ROUTING_KEY',
    prefetch: 0 // optional, default=0 witch means unlimited
  }
};

chapar.RPCServer(app, config);

// Common Express error handler

module.exports = app;
And thats it. no need to other changes to be done in your Express server application.
configure an export an instance of Chapar.RPCClient:
import {RPCClient} from 'chapar';

const ConfiguredRPCClient = RPCClient({
  rabbitMQ: { // required
    host: 'localhost', // required
    port: 5672, // required
    username: 'RABBITMQ_USERNAME', // optional, (needed if rabbitMQ requires authentication)
    password: 'RABBITMQ_PASSWORD' // optional, (needed if rabbitMQ requires authentication)
  },
  exchange: { // required
    name: 'MY_APP_EXCHANGE_NAME', // required
    type: 'direct', // optional, default='direct'
    options: { // optional
      durable: true // optional, default='{ durable: true }'
    }
  },
  replyQueue: {
    name: '', // optional, default=''
    options: { // optional
      exclusive: true // optional, default={ exclusive: true }
    },
    prefetch: 0 // optional, default=0 witch means unlimited
  },
  publish: { // optional
    routingKey: 'HTTP_OVER_AMQP_ROUTING_KEY', // optional, default='HTTP_OVER_AMQP_ROUTING_KEY',
    options: { // optional
      persistent: true // optional, default=true
    }
  }
});
Some piece of code that need some processing in remote micro-server.
Access to remote micro-server with just one line of code:
const { status, body, headers } = await ConfiguredRPCClient(
    'GET', // method
    '/users', // url
    {}, // cookies
    { name: 'John' }, // query
    { Authorization: 'Bearer abcd...' }, // headers
    {} // body
);
console.log(`status: ${status}, body: ${body}, headers: ${headers}`);
An Example output may be:
status: 200,
body: { name: 'John', lastname: 'Doe', phone: '+1001001001' },
headers: { 'x-last-login': '1583048837564' }In some cases, both micro-services may act as client and both as server. i.e. each serves some processing to for the other. You can use both Chapar.RPCServer and Chapar.RPCClient in each one the micro-services.
run server example:
npm run dev-run-example-rpc-express
run client example:
npm run dev-run-example-rpc-client
run tests:
npm run test