-
Notifications
You must be signed in to change notification settings - Fork 4
Clothing Item Configuration
Configures items that can be worn.
Uses all properties of Basic Items
Where the item can be worn, e.h. Head, Feet.
Most regions offer multiple "slots" on the clothing screen.
Each of these slots represents a Layer. The layers are Base, Mid, Top, Top2.
Examples:
- Boots are
Feet,Top - Gloves are
Hands,Base - Jackets are
Chest,TopandTop2 - Hats are
Head,BaseandMid
The representation on the clothing screen is done with additional textures (images) and not derived from their 3D models!
There are different textures for the female and male clothing model and for damaged and undamage items.
This means there must be 4 additional textures for each clothing item.
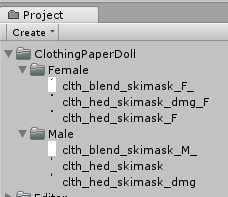
The 4 textures must share a basename and be organized in a specific folder structure:
- ClothingPaperDoll/Male/[main_basename].png (male + undamaged)
- ClothingPaperDoll/Male/[main_basename]_dmg.png (male + damaged)
- ClothingPaperDoll/Female/[main_basename]_F.png (female + undamaged)
- ClothingPaperDoll/Female/[main_basename]_dmg_F.png (female + damaged)
The field Main Texture is to be set to "[main_basename]".
Two additional grayscale textures (one for female, one for male) determine how to blend between the undamaged and damaged textures.
The darker a blend area is the less damage is required to render the damaged texture instead of the undamaged one.
White areas will always render the undamaged texture, black areas will always render the damaged area.
- ClothingPaperDoll/Male/[blend_basename]_M_.png (male)
- ClothingPaperDoll/Female/[blend_basename]_F_.png (female)
The field Blend Texture is to be set to "[blend_basename]_M_"

