-
Notifications
You must be signed in to change notification settings - Fork 0
Project Manager
The Torque 3D Project Manager is an optional utility that helps you create new projects based on Torque 3D Templates as well as manage existing projects.
The Project Manager may be downloaded from here:
Just follow the instructions in its ReadMe file on where to install it. (All versions of the Project Manager may be found here: Project Manager Archive)
If you wish to instead compile from source, head over to the Project Manager repository: Torque3D-ProjectManager It uses Qt 4.8.x for its interface so you will need to obtain that first.
Torque 3D has a number of Templates that may be used as a starting point for your own project. The Project Manager makes it easy to create new projects from these Templates. Begin by launching Project Manager.exe.
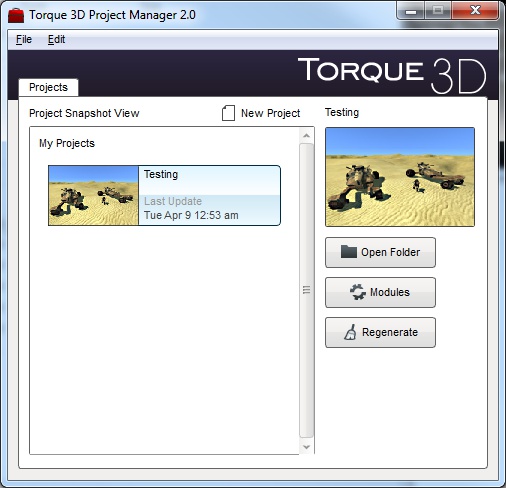
This is the main window of the Project Manager that displays a list of any existing projects. To create a new project, click on the New Project button.
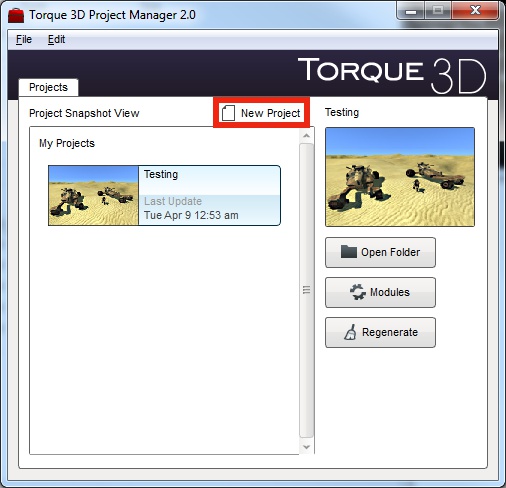
This will open the Create a New Project window.
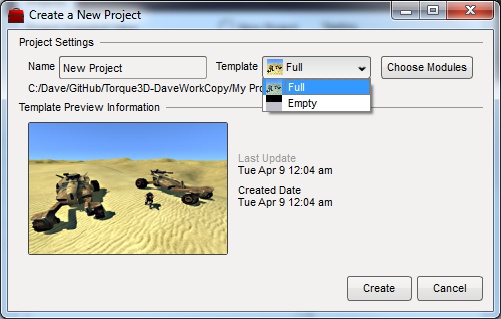
From here you may give your project a new name and choose which Template will be copied to your project. Torque 3D is also made up of a number of optional modules that may be compiled into the code base. These modules may determine which physics library will be used, or that a particular input device will be supported. To choose which modules will be included with your project you click on the Choose Modules button.
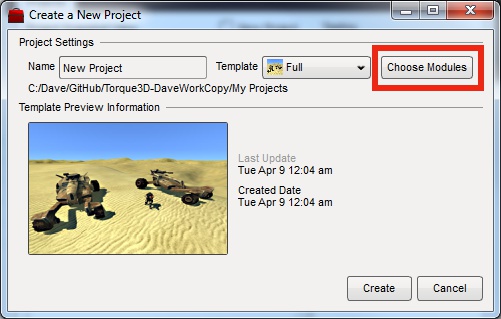
This opens the Project Modules window.
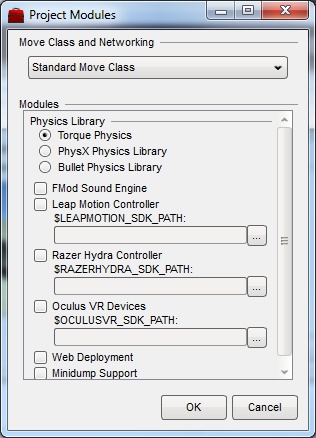
From this window you select which modules you want to include and click on the OK button. Please see the Using the Project Modules Windows section below for more information on using this window.
With your new project now all set up you click on the Create button. A new window will open informing you of the project creation progress which includes copying the files from the chosen Template, configuring all of the project's files, and generating the project's solution for compiling. Your project is now ready to be turned into your game!
You may change which optional modules are compiled into your project at any time. This is done from the main Project Manager window by first selecting your project and then clicking on the Modules button.
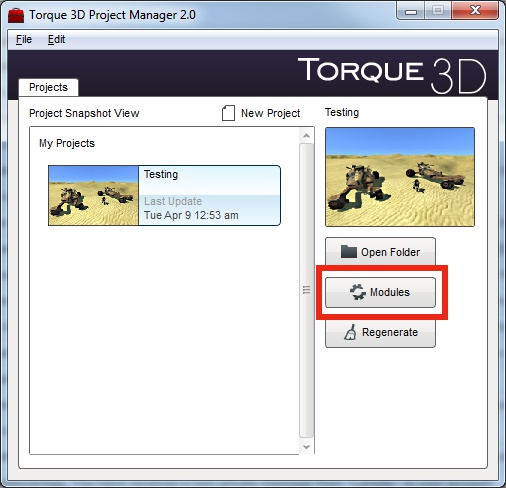
NOTE: Prior to changing any modules, be sure to close your project's solution in Visual Studio
This will open the Project Modules window. From here you may make changes to which modules or Move class will be used by your project.
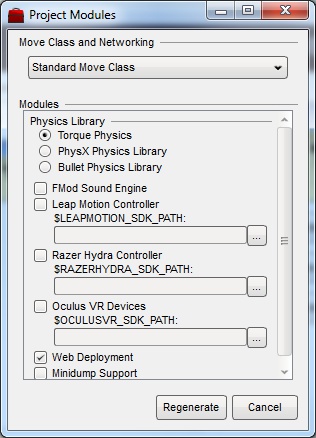
After you have made your changes you click on the Regenerate button. This will automatically regenerate your project's solution files, and your project may be recompiled. For more information on using the Project Modules window please see the next section.
The Project Modules window is divided into two sections.
The top section allows you to choose the type of Move class and networking that will be used.
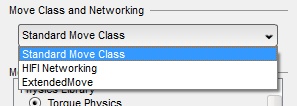
The Standard Move Class is what the majority of games will use. This allows sending of a player's movements (such as from mouse, keyboard or joystick) to the server for the object they are controlling. This also provides the standard tick processing for the server's network traffic.
The HIFI Networking choice operates the same as the Standard Move Class except that the server's network processing is no longer bunched together per tick. Instead the networked movement process happens more often and is intended for high speed objects that may collide together. This mode was intended to be used by racing games, for example. Unfortunately, this mode has not received a lot of attention and may require some additional work to use.
The ExtendedMove choice enables an extended version of the standard Move class. This allows for the sending of absolute position and rotation values to the game's server. This is very useful when dealing with input devices that support his type of data, such as the Leap Motion, Razer Hydra and Oculus Rift. Please see the ExtendedMove Page for more information, as well as the pages for the specific input device you are interested in.
The middle section is where you may choose the modules that will be compiled into your project.
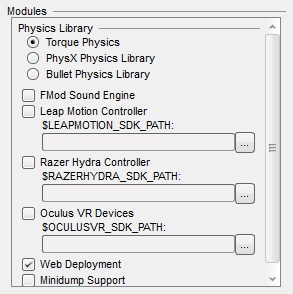
Modules may either be part of a group where one of them must be selected (such as the Physics Library group) or standalone with a checkbox to choose the module.
Some modules require additional information from the user such as a path to a 3rd party SDK. An example of this is the Razer Hydra controller in the image above. If that module is chosen then you need to provide a path to the SDK (which is the SixenseSDK_062612 directory as of this writing). You may either manually enter the path into the text field, or click on the button beside the text field to choose a directory.
If you opened the Project Modules window from the Create a New Project window then you will have an OK button at the bottom of the window. However, if you came here from the main Project Manager window using the Modules button, there will be a Regenerate button at the bottom. Clicking on this button will automatically regenerate your project's solution files so you may recompile your project. Before clicking on this button be sure to close your solution in Visual Studio.
NOTE: Prior to changing any modules, be sure to close your project's solution in Visual Studio
The Project Manager module list is defined in the projects.xml file that is included with the Project Manager. Here is what the file looks like as of Project Manager 2.0:
<!-- World Builder Launcher Project Entries

Entry Attribute Descriptions

'type'
projectDirectory  = Assumes that one directory down is the project, and inside is the executable
file              = Execute the file directly

'path'
Path to the root project directory, or directly to the file (including file itself)

'args'
Any additional command line switches to be sent to the executable.

Here are some examples:
<entries>
  <entry type="projectDirectory" path="Demos" args="">Demos</entry>
  <entry type="projectDirectory" path="Genre Kits" args="">Genre Kits</entry>
  <entry type="file" path="Demos/Stronghold/game/rStronghold.exe" args="">Stronghold Demo</entry>
</entries>
-->
<entries>
  <entry type="projectDirectory" path="My Projects" args="">My Projects</entry>
  <entry type="projectDirectory" path="Games" args="">Games</entry>
  <entry type="projectDirectory" path="Demos" args="">Demos</entry>
  <entry type="projectDirectory" path="Examples" args="">Examples</entry>
  <entry type="projectDirectory" path="Genre Kits" args="">Genre Kits</entry>
  <entry type="templateDirectory" path="Templates" args="">Templates</entry>

  <entry type="modules">
    <module name="fmod">FMod Sound Engine</module>
    <module name="leapMotion" path="$LEAPMOTION_SDK_PATH">Leap Motion Controller</module>
    <module name="razerHydra" path="$RAZERHYDRA_SDK_PATH">Razer Hydra Controller</module>
    <module name="oculusVR" path="$OCULUSVR_SDK_PATH">Oculus VR Devices</module>
    <module name="webDeploy">Web Deployment</module>
    <moduleGroup description="Physics Library">
      <module name="" donotwrite="1" default="1">Torque Physics</module>
      <module name="physX">PhysX Physics Library</module>
      <module name="bullet">Bullet Physics Library</module>
    </moduleGroup>
  </entry>

  <entry type="projectDefines">
    <projectDefine name="TORQUE_MINIDUMP">Minidump Support</projectDefine>
  </entry>

  <entry type="moveClasses">
    <moveClass name="" donotwrite="1" default="1">Standard Move Class</moveClass>
    <moveClass name="$TORQUE_HIFI_NET">HIFI Networking</moveClass>
    <moveClass name="$TORQUE_EXTENDED_MOVE">ExtendedMove</moveClass>
  </entry>
</entries>
If you wanted to add your own optional modules you may add them to the <entry type="modules"> section. Just follow the same pattern as with the other modules there. And if your module requires a variable to point to a directory then just include the path attribute with its name.
Behind the scenes all the Project Manager is doing is modifying your project's project.conf file just as you would manually do.
Project Manager Archive
ExtendedMove Page
Leap Motion Controller Page
Razer Hydra Controller Page
Oculus Rift Page