-
Notifications
You must be signed in to change notification settings - Fork 0
Manual of ''Quanto Flx System'' Package
Note
This manual still has some imperfections (in "Parameters & Variables" section). If you have suggestions, you can create an issue.
Tip
Use a widescreen device such as a computer or tablet for better readability.
| Item | Item | Item | Item |
|---|---|---|---|
| Generic System Monitoring Skins | CPU Processors | Recycle Bin | Screen Brightness |
| Top Process | Volume |
Most of the features of these skins rely on third-party system monitoring software to provide information. If such software is not installed on your device, or has not been configured, you will only be able to use limited functionality.
You will need to set up your system monitoring software and skin configurations accordingly for your device.
Currently, AIDA64 and HWiNFO are supported.
If your device does not have a system monitoring software installed, please click the link below to download it:
The advantage of AIDA64 is that its configuration is relatively simple. However, it should be noted that AIDA64 is a paid software with a trial period of 30 days.
HWiNFO is free software, and its authors work closely with the Rainmeter community to keep it as free as possible. Although Quanto Flx does not require its Pro version to be installed on your device, I personally recommend that you at least purchase a copy to show your appreciation.
Important
If you are using a 64-bit system, please download the 64-bit version instead of the 32-bit version.
For AIDA64 Users
- Open AIDA64, cilck "File" at menu and select "Preferences".
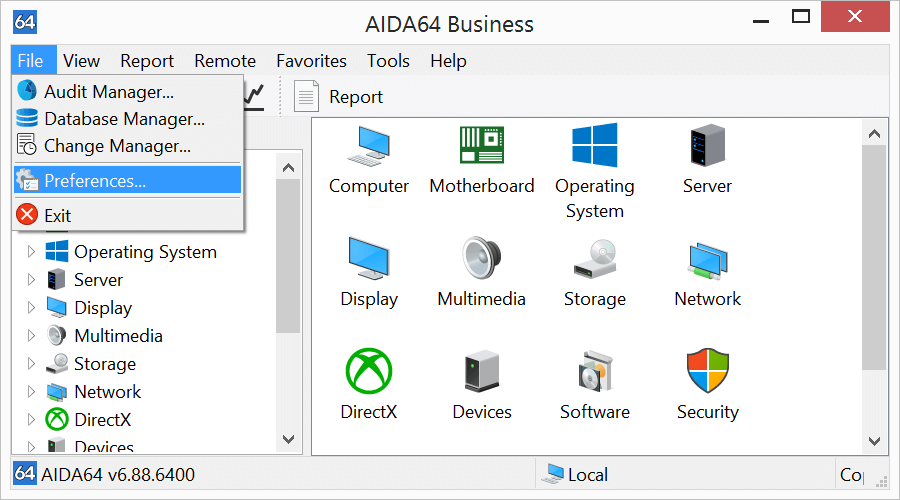
- Down "Hardware Monitoring" category at the left menu, select "External Applications" page, check "Enable writing sensor values to Registry" at right. Check the required entries in the list.

- Confirm all the dialog, and refresh these skins. Ensure that AIDA64 is running in the background.
For HWiNFO Users
- When you launch it for the first time, check "Sensors-only", then click "Start".

- You will open Sensors Status. Click "Configure Sensors" below.

- Click "Main Settings", and set up as shown below.
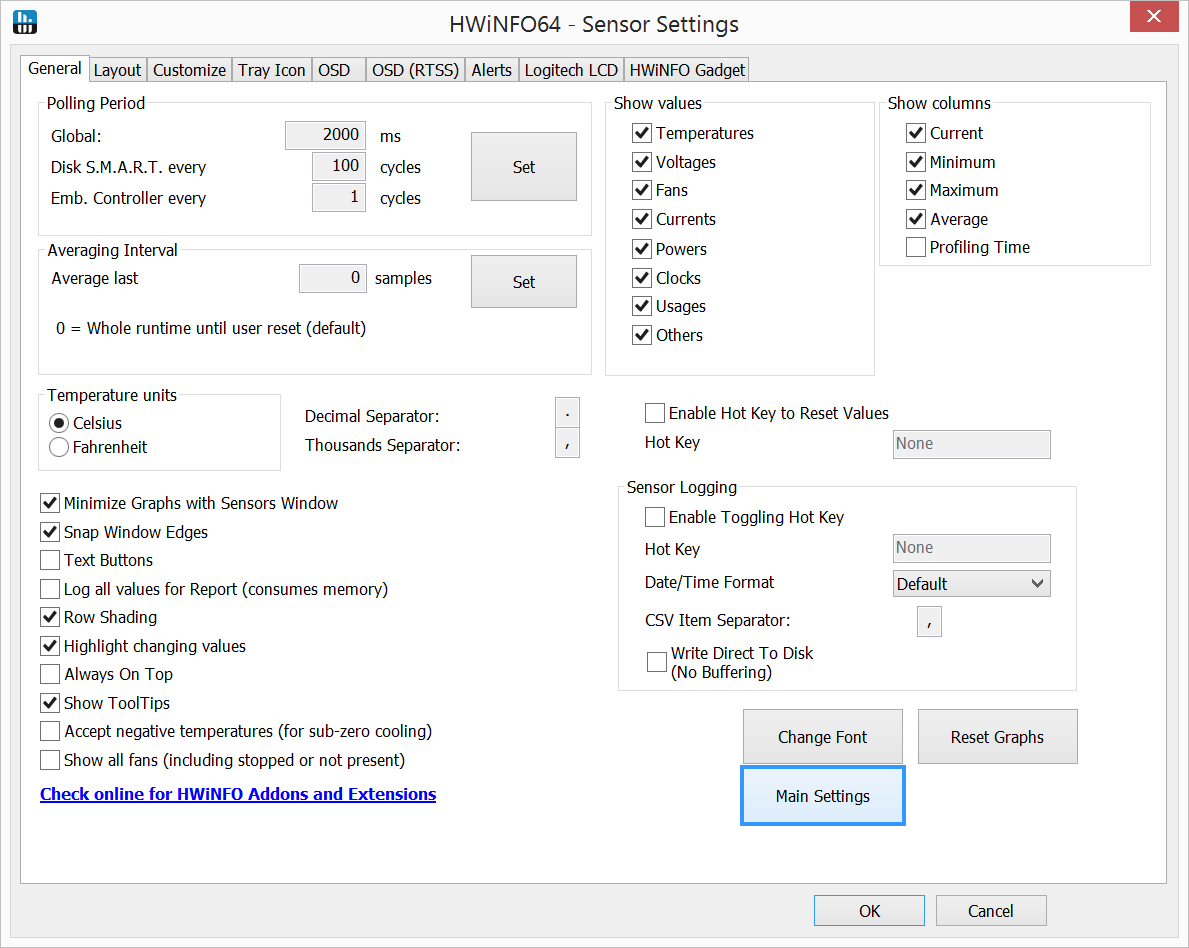
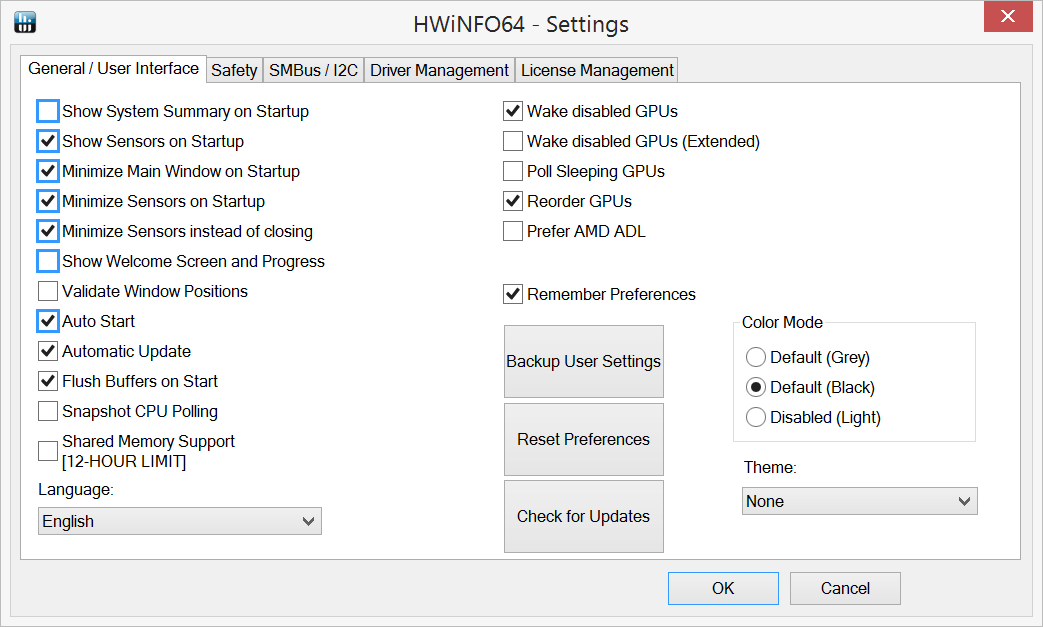
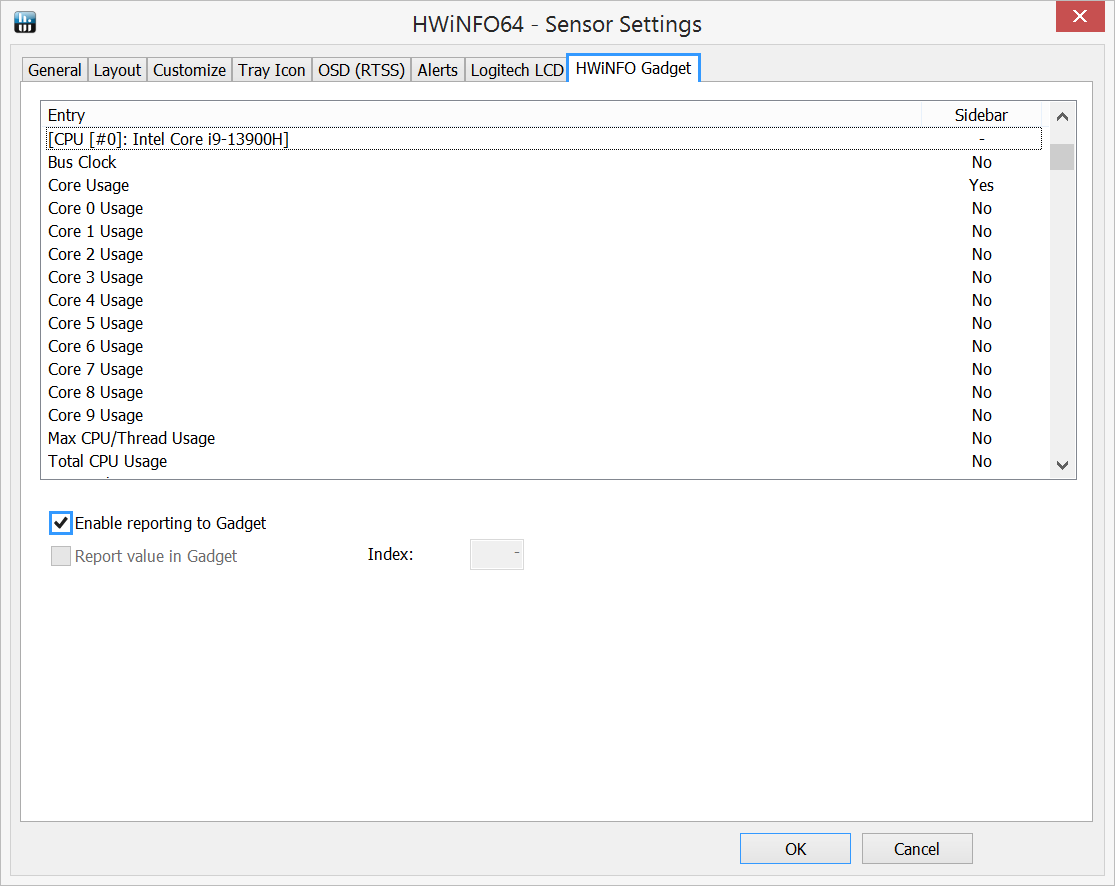
- Click "OK" to go back to Sensor Settings, then select "HWiNFO Gadget" at the top, and check "Enable reporting to Gadget" below.
-
Enable the required entries in the list. If you need to make an entry available:
-
Click this entry in the window.
-
Check "Report value in Gadget".
-
Once you've made all the entries you need available, you'll need to look at the list from the beginning and record the index of the enabled entries. This will facilitate subsequent setups.
-
-
When you're done, click OK and let HWiNFO keep running in the background.
Some skins require additional settings in addition to their own skin settings in order to obtain information from system monitoring software.
You can view them by clicking the "Browse Files" button next to "Edit Additional Configurations" option in the Package's "Settings" page, or by opening the skin settings for these skins and selecting "Edit Additional Configuration".
For an entry, there are four variables that can be set:
INrefers to the internal name.
| Variable Name | Description | Possible Value |
|---|---|---|
SMLs.(IN).Show |
It determines whether this entry is displayed in the skin. |
0 - Hide1 - Show |
SMLs.(IN).RSKN |
It determines which value in the registry this entry reads. |
AIDA64 - The full name of the value HWiNFO - Index displayed in HWiNFO, just numbers |
SMLs.(IN).Sbtt |
It determines which keywords will be replaced in the displayed text. Regular expressions are supported. | Format: "pattern1":"replacement1","pattern2":"replacement2"Rainmeter Manual |
SMLs.(IN).Sufx |
It determines its suffix and usually its unit. | Its unit |
It can be seen that these skins read the information of system monitoring software through the Registry. Once you have followed the instructions above, you should be able to find the values under the following keys:
For 32-bit systems,
64below needs to be replaced with32.
| Software | Key |
|---|---|
| AIDA64 | Computer\HKEY_CURRENT_USER\Software\FinalWire\AIDA64\SensorValues |
| HWiNFO | Computer\HKEY_CURRENT_USER\Software\HWiNFO64\VSB |
For AIDA64 Users
In AIDA64, an entry in the registry is divided into two values:
Arepresents the abbreviation of the hardware type in AIDA64, andTrepresents the type of this value, including:
Type Description Possible Unit FFan Speed RPM/%Plow-power WSSystem (Depends on the situation) TTemperature °C/°FVVoltage V
| Value | Description |
|---|---|
Label.(T)(A) |
The label of this sensor. |
Value.(T)(A) |
The raw value reported by this sensor. |
For HWiNFO Users
In HWiNFO, an entry in the registry is divided into five values:
Irepresents the index of this sensor in HWiNFO.
| Value | Description |
|---|---|
Color(I) |
This refers to the color of the entries displayed in Windows 7 Gadgets. This has nothing to do with Quanto Flx. |
Label(I) |
The label of this sensor. |
Sensor(I) |
The hardware name corresponding to this sensor. |
Value(I) |
The value reported by this sensor. It comes with units, but Quanto Flx uses raw values, so this has nothing to do with Quanto Flx. |
ValueRaw(I) |
The raw value reported by this sensor. |
Your device may not have all of the below parameters, or some of the parameters may use different names. Please configure as many of them as possible according to your device. If you want to hide some parameters because they do not exist, please set SMLs.(IN).Show variable as 0.
For HWiNFO users, please try to find the following entries ALL AT ONCE, because in HWiNFO, the index of the sensors may change as the order changes, making the previously set index list unusable.
INrefers to the internal name.*refers to the coatings, which represents any number or letters.
| Item | Item | Item | Item |
|---|---|---|---|
| Battery | Cooling Fans | CPU | CPU Processors |
| GPU | Physical Drives | RAM | Video Memory |
Find these in your system monitoring software:
| Internal Name | Friendly Name | Possible Unit | Possible Name in AIDA64 | Possible Name in HWiNFO |
|---|---|---|---|---|
CurrentCharge |
Current Charge | Wh |
??? | 🕒 Remaining Capacity [Battery] |
MaxCharge |
Max Charge | Wh |
??? | ??? |
WearLevel |
Wear Level | % |
🔋 Battery Wear Level [💻 System] Value.SBATTWEARLVL
|
🕒 Wear Level [Battery] |
Voltage |
Voltage | V |
🔋 Battery [⚡ Voltage Values] Value.VBATT
|
⚡ Battery Voltage [Battery] |
ChargeRate |
Charge Rate |
W / %
|
🔋 Battery Charge Rate [⚡ Power Values] Value.PBATTCHR
|
??? |
Find these in your system monitoring software:
| Internal Name | Friendly Name | Possible Unit | Possible Name in AIDA64 | Possible Name in HWiNFO |
|---|---|---|---|---|
CoolingFanSpeed |
Cooling Fan Speed |
RPM / %
|
🖥️ Chassis #* [⚙️ Fan Speed] Value.FCHA*
|
??? |
MaxCoolingFanSpeed |
Maximum Cooling Fan Speed | RPM |
??? | ??? |
Then, you need to pay attention to how this entry expresses the fan speed so you can set the Expression variable:
| Value | Description |
|---|---|
0 |
Percentage, in "%" as its unit |
1 |
Specific value, fixed maximum value, in "RPM" as its unit |
2 |
Specific value, dynamic maximum value, in "RPM" as its unit |
If you set Expression to 1, you also need to set MaxValue (in RPM).
You can customize the title of this skin by modifying CustomName variable.
Find these in your system monitoring software:
| Internal Name | Friendly Name | Possible Unit | Possible Name in AIDA64 | Possible Name in HWiNFO |
|---|---|---|---|---|
CPUClock |
CPU Clock | MHz |
⚙️ CPU Clock [💻 System] Value.SCPUCLK
|
🕒 Core Clocks [CPU] |
Temperature |
Temperature |
°C / °F
|
⚙️ CPU Package [🌡️ Temperatures] Value.TCPUPKG
|
🌡️ Core Max [CPU: DTS] 🌡️ CPU(Tdie) [???] 🌡️ CPU (Tctl/Tdie) [???] |
CoolingFanSpeed |
Cooling Fan Speed | RPM |
⚙️ CPU [⚙️ Fan Speed] Value.FCPU
|
??? |
Voltage |
Voltage | V |
⚙️ CPU [⚡ Voltage Values] Value.VCPU
|
⚡ Core VIDs [CPU] |
Power |
Power | W |
⚙️ CPU Package [⚡ Power Values] Value.PCPUPKG
|
⚡ CPU Package Power [CPU: Enhanced] |
Find these in your system monitoring software:
| Internal Name | Friendly Name | Possible Unit | Possible Name in AIDA64 | Possible Name in HWiNFO |
|---|---|---|---|---|
Temperature |
Temperature |
°C / °F
|
⚙️ CPU Core #* [🌡️ Temperatures] Value.TCC-*-*
|
🌡️ *-core * [CPU: DTS] |
CPUClock |
CPU Clock | MHz |
⚙️ CPU Core #* Clock [💻 System] Value.SCC-*-*
|
🕒 *-core * Clocks [CPU] |
These system monitoring software monitors physical CPU cores, not logical CPU cores. Most computers today are hyperthreaded, which means that one physical CPU core can run two threads, and therefore, will be seen as two logical CPU cores in Windows. Some newer CPUs have hybrid CPU cores, which will be distinguished as hyperthreaded performance cores (P-core) and low-power efficiency cores (E-core) in these system monitoring software. In this skin, one physical core is seen as two logical cores.
Find these in your system monitoring software:
| Internal Name | Friendly Name | Possible Unit | Possible Name in AIDA64 | Possible Name in HWiNFO |
|---|---|---|---|---|
Utilization |
Utilization | % |
⌛ GPU* Utilization [💻 System] Value.SGPU*UTI
|
🕒 GPU Core Load [GPU] |
Temperature |
Temperature |
°C / °F
|
💻 GPU* [🌡️ Temperatures] Value.TGPU*
|
🌡️ GPU Temperature [GPU] |
Clock |
Clock | MHz |
❎ GPU* Clock [💻 System] Value.SGPU*CLK
|
🕒 GPU Clock [GPU] |
CoolingFanSpeed |
Cooling Fan Speed | RPM |
💻 GPU* [⚙️ Fan Speed] Value.FGPU*
|
??? |
Voltage |
Voltage | V |
💻 GPU* [⚡ Voltage Values] Value.VGPU*
|
⚡ GPU Core Voltage [GPU] |
Power |
Power | W |
💻 GPU* [⚡ Power Values] Value.PGPU*
|
⚡ GPU Power [GPU] |
Find these in your system monitoring software:
| Internal Name | Friendly Name | Possible Unit | Possible Name in AIDA64 | Possible Name in HWiNFO |
|---|---|---|---|---|
Name |
Name | - | 💽 (The Hardware Name of Hard Disk) [🌡️ Temperatures] Label.THDD*
|
(Not required) |
Temperature |
Temperature |
°C / °F
|
💽 (The Hardware Name of Hard Disk) [🌡️ Temperatures] Value.THDD*
|
🌡️ Drive Temperature [S.M.A.R.T.] |
Voltage |
Voltage | V |
💽 (The Hardware Name of Hard Disk) [⚡ Voltage Values] Value.VHDD*
|
??? |
RemainingLife |
Remaining Life | % |
??? | 🕒 Drive Remaing Life [S.M.A.R.T.] |
Then, you need to determine which logical hard disks this physical hard disk corresponds to. Set the Partition.* variable to 1 to indicate that this logical hard disk belongs to this physical hard disk, otherwise set it to 0.
Logical hard disk refers to the partition of physical hard disk by Windows, such as
C:,D:, etc.
Find these in your system monitoring software:
| Internal Name | Friendly Name | Possible Unit | Possible Name in AIDA64 | Possible Name in HWiNFO |
|---|---|---|---|---|
Clock |
Clock | MHz |
⚙️ Memory Clock [💻 System] Value.SMEMCLK
|
🕒 Memory Clock [Memory Timings] |
Speed |
Speed | - | ⚙️ Memory Speed [💻 System] Value.SMEMSPEED
|
??? |
Timings |
Timings | - | ⚙️ Memory Timings [💻 System] Value.SMEMTIM
|
??? |
Find these in your system monitoring software:
| Internal Name | Friendly Name | Possible Unit | Possible Name in AIDA64 | Possible Name in HWiNFO |
|---|---|---|---|---|
FreeVideoMemory |
Free Video Memory | (Determined by Unit variable) |
⚙️ Free Video Memory [💻 System] Value.SFREEVMEM
|
🕒 GPU Memory Available [GPU] |
UsedVideoMemory |
Used Video Memory | (Determined by Unit variable) |
⚙️ Used Video Memory [💻 System] Value.SUSEDVMEM
|
🕒 GPU Memory Allocated [GPU] |
TotalVideoMemory |
Total Video Memory | (Determined by Unit variable) |
??? | ??? |
Then, you need to determine how the total video memory is calculated using the OperationMethod variable:
| Value | Description |
|---|---|
0 |
Total Video Memory is already known |
1 |
Free Video Memory + Used Video Memory |

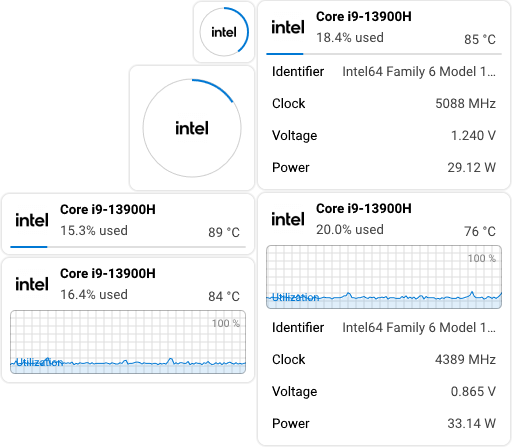
"Generic System Monitoring Skins" is a collective name for the following 11 skins:
| Item | Item | Item | Item |
|---|---|---|---|
| Battery | Cooling Fans (8) | Customizable Skins (16) | CPU |
| Drives (26) | GPU (8) | Network | Physical Drives (8) |
| RAM | System | Video Memory |
Click the icon to perform a specific action, such as opening the Task Manager.
| Skin | Action After Clicking the Icon |
|---|---|
| Battery | Open "Power Options" |
| CPU | Open "Task Manager" |
| Drives | Open this drive via Explorer |
| Network | Open "Network and Sharing Center" |
| System | Open "System" in Settings or Control Panel |
| Common Options | Availability |
|---|---|
| Gradient Background | 🟢 |
| Combination | 🟢 |
| Opacity | 🟢 |
| Variable Name | Friendly Option Name | Type | Possible Values | Default | Description |
|---|---|---|---|---|---|
SkinIndex |
Index of CPU | Integer | [0,7] | 0 | Normally, you don't need to modify it unless the skin is abnormal. |
UsageMon |
Data from Resource Monitor | Integer | 0/1 | 1 | For Windows 8 or newer system users, enabling this feature can improve the accuracy of this skin for CPU usage. This feature is not available in Windows 7. |
| Variable Name | Friendly Option Name | Type | Possible Values | Default | Description |
|---|---|---|---|---|---|
WiFiIntfID |
ID of Wireless Interface Adapter | Integer | [0,15] | 0 | Normally, you don't need to modify it unless the skin is abnormal. |
HideIP |
Hide my IP Address | Integer | 0/1 | 1 | - |
ShowPing |
Show "Ping" | Integer | 0/1 | 1 | - |
PingAddress |
Ping to... | String | A website | www.bing.com |
- |
Generally, you don't need to understand this section unless you want to create a system monitor yourself.
Click to view content
| Variable Name | Friendly Name | Possible Values | Description |
|---|---|---|---|
Pn.Im |
Icon | The path of a local image | This icon must be a square, monochrome icon. |
Pn.Im.Tltt |
"Tool Tip Text" of the icon | Any text | Leave blank if not required. |
Pn.Im.Enab |
Enable actions after clicking the icon |
0 - Disable 1 - Enable |
- |
Pn.Im.LMUA |
The action that is taken when the icon is clicked |
Rainmeter Bangs Command, enclosed with []
|
If you want to open a directory or application, you need to fill in: ["(Path)"]. |
Pn.Tt |
Title | Any text | It cannot be blank. |
Pn.PrgBCalc |
The formula for the source of the progress bar | Formula | It must have a maximum value of 100 and a minimum value of 0. If not needed, write 0 or 100. |
Pn.Dsply1x1 |
The value displayed by the skin in 1x1 & 2x2 styles | Any text | It is recommended to fill in [Ms.PrgBCalc:0]. |
The variable names in this part consist of Pn.Dsply4x1.(Position).(Suffix).
| Position | Friendly Name |
|---|---|
00 |
Left Top |
10 |
Left Bottom |
01 |
Right Top |
11 |
Right Bottom |
| Suffix | Friendly Name | Possible Values | Description |
|---|---|---|---|
Sw |
Show up or not |
0 - Hide 1 - Show |
- |
Tx |
Displayed text content | Any text |
%1 - Display the current value of the Measure defined in P1 %2 - Display the current value of the Measure defined in P2 #Pn.Tt# - Title of the skin #Tm.1_used# - Equivalent to "%1 used", P1 is required to define #Tm.1_available# - Equivalent to "%1 available", P1 is required to define |
P1 |
Measure Name #1 | The name of a valid Measure | When filling in the Measure name, there is no need to enclose it with []. |
P2 |
Measure Name #2 | The name of a valid Measure | When filling in the Measure name, there is no need to enclose it with []. |
AS |
Automatically scales the Measure values or not | See in Rainmeter Manual | This is equivalent to the AutoScale option in the String meter. |
The variable names in this part consist of Pn.DsplyDtd.(Position).(Suffix).
"Position" indicates the row position of this entry in the skin. When you specify that a row is hidden, the row will be collapsed and covered by the items below it.
The explanation about "Suffix" is the same as above.
First, you need to determine the quantity of line charts to display by setting the Pn.DplHisto.Qtt variable. It must be 1 or 2, even if the skin don't need to have a style with line chart.
The variable names in this part consist of Pn.DplHisto.(Position).(Suffix).
"Position" means first or second.
| Suffix | Friendly Name | Possible Values | Description |
|---|---|---|---|
Ms |
Measure Name | The name of a valid Measure | This Measure must be able to provide a numeric value. When filling in the Measure name, there is no need to enclose it with []. |
AS |
Automatically scales the Measure values or not | 0/1, See in Rainmeter Manual | It is recommended to set it to 1 only when this Measure does not specify a maximum or minimum value. |
Tx.Tt |
Title displayed in the lower left of the line chart | Any text |
%1 and %2 are not available. |
Tx.Tx |
Text displayed in the upper right of the line chart | Any text |
%1 - Display the current value of the Measure defined in P1 %2 - Display the current value of the Measure defined in P2 #Pn.Tt# - Title of the skin #Tm.1_used# - Equivalent to "%1 used", P1 is required to define #Tm.1_available# - Equivalent to "%1 available", P1 is required to define |
P1 |
Measure Name #1 | The name of a valid Measure | When filling in the Measure name, there is no need to enclose it with []. |
P2 |
Measure Name #2 | The name of a valid Measure | When filling in the Measure name, there is no need to enclose it with []. |
Tx.AS |
Automatically scales the Measure values or not | See in Rainmeter Manual | This is equivalent to the AutoScale option in the String meter. |
If needed, you can add variables in the [Variables] section.
Customized system monitoring skins often require the addition of custom Measures. Please add Measures as appropriate.
Here are some sample Measures:
[Ms.CPU.Percent]
Measure=Plugin
Plugin=UsageMonitor
Category=Processor Information
Counter=% Processor Utility
Name="0,_Total"
DynamicVariables=1

[Ms.CPU.Percent_Suffix]
Measure=String
String=[Ms.CPU.Percent:1]%
DynamicVariables=1

[Ms.Registry.Identifier]
Measure=Registry
RegHKey=HKEY_LOCAL_MACHINE
RegKey=HARDWARE\DESCRIPTION\System\CentralProcessor\0
RegValue=Identifier
RegExpSubstitute=1
Substitute="\(R\)":"","\(TM\)":"","\(tm\)":"","Intel ":"","\d+th Gen ":"","CPU ":""," @.*":"","AMD ":"","Threadripper PRO ":"TRP ","Threadripper ":"TR "," \w+-Core.*":""," \d+-Core.*":""," with.*":""," w/.*":""," Microsoft.*Edition":"","\s{2,}":" ","\s$":""
UpdateDivider=-1

[Ms.Registry.Temperature]
Measure=Registry
RegHKey=HKEY_CURRENT_USER
RegKey=Software\FinalWire\AIDA[#Is64bit_[#Is64bit]]\SensorValues
RegValue=Value.TCPU
DynamicVariables=1
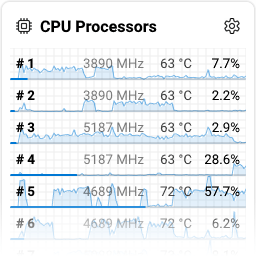
Displays the current CPU usage for each processor.
| Common Options | Availability |
|---|---|
| Gradient Background | 🟢 |
| Combination | 🟢 |
| Opacity | 🟢 |
| Variable Name | Friendly Option Name | Type | Possible Values | Default | Description |
|---|---|---|---|---|---|
SkinIndex |
Index of CPU | Integer | [0,7] | 0 | Normally, you don't need to modify it unless the skin is abnormal. |
UsageMon |
Data from Resource Monitor | Integer | 0/1 | 1 | For Windows 8 or newer system users, enabling this feature can improve the accuracy of this skin for CPU usage. This feature is not available in Windows 7. |
Temp.Show |
Show "Temperature" | Integer | 0/1 | 1 | - |
Clock.Show |
Show "Clock" | Integer | 0/1 | 1 | - |
Histo.Show |
Show Line Charts | Integer | 0/1 | 1 | - |


Same as the "Recycle Bin" icon on the desktop.
Click to open the Recycle Bin. Drag a file into this skin to move it to the Recycle Bin.
Only available in "Customizable Size" style: Drag 
| Option | Description |
|---|---|
| Empty the Recycle Bin | Empty the Recycle Bin. |
| Common Options | Availability |
|---|---|
| Gradient Background | 🟢 |
| Combination | 🟢 |
| Opacity | 🟢 |
| Variable Name | Friendly Option Name | Type | Possible Values | Default | Description |
|---|---|---|---|---|---|
SPW |
Width | Integer | [2,16] | 4 | The custom width of this skin in "Customizable Size" style. |
SPH |
Height | Integer | [2,16] | 2 | The custom height of this skin in "Customizable Size" style. |
QuickResize |
Enable "Quick Resizing" | Integer | 0/1 | 1 | If turned off, |
CstmIm_0 |
Custom Icon (Empty) | String | The path of a local image | #Pk@#Image\RecycleBin_0.png |
This option is only effective when "Icon style" is "Custom". |
CstmIm_1 |
Custom Icon (Full) | String | The path of a local image | #Pk@#Image\RecycleBin_1.png |
This option is only effective when "Icon style" is "Custom". |


Option to adjust the brightness of the screen.
This skin is only available if your screen is able to adjust the brightness through the system.
Drag the slider or scroll the mouse wheel to adjust the screen brightness.

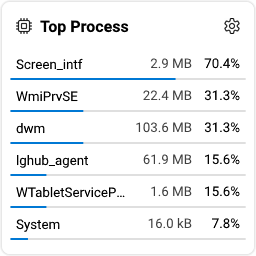
Displays the processes that use the highest resources.
| Common Options | Availability |
|---|---|
| Gradient Background | 🟢 |
| Combination | 🟢 |
| Opacity | 🟢 |
| Variable Name | Friendly Option Name | Type | Possible Values | Default | Description |
|---|---|---|---|---|---|
Quantity |
Quantity | Integer | [1,6] | 6 | Defines the capacity of this skin. This will determine the size of it. |

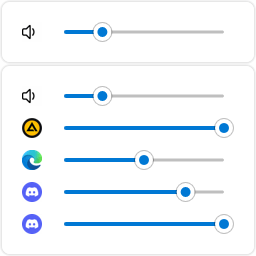
Options to adjust the global volume or the volume of each app.
Drag the slider or scroll the mouse wheel to adjust the volume.
Only available in "Customizable Size" style: Drag 
| Common Options | Availability |
|---|---|
| Gradient Background | 🟢 |
| Combination | 🟢 |
| Opacity | 🟢 |
| Variable Name | Friendly Option Name | Type | Possible Values | Default | Description |
|---|---|---|---|---|---|
Quantity |
Quantity | Integer | [0,6] | 6 | Defines the capacity of this skin. This will determine the size of it. |
AutoQ |
Dynamic Quantity | Integer | 0/1 | 0 | If enabled, this skin will change its size based on the quantity of active applications. This feature will always override the existing set quantity. |


