-
Notifications
You must be signed in to change notification settings - Fork 0
QFS ‐ QFSDI ‐ Current Skin path ‐ Skin config ‐ For all skin types
QFS ‐ QFSDI ‐ Current Skin path - Skin config - For all skin types
- For all meters
-
Create a
StringMeter - Create a
ImageMeter with a monochrome icon - Create a button
- Create the entry of "Quick Resizing"
Important
All key values related to SIZE and POSITION in ALL Meters MUST be multiplied by #Sc# to adapt to scaling.
All String Meters MUST have the St.Ft Style applied to them in order for the text to display properly. Here is an example:
[Mt.SampleString]
Meter=String
MeterStyle=St.ZnCt|St.Ft
Text=Lorem Ipsum dolor sitApply this Style to enable Quanto Flx Common Text Formats (aka QFCTF). Here is an example:
[Mt.SampleQFCTF]
Meter=String
MeterStyle=St.ZnCt|St.Ft|St.Ft.CmTxFm
Text=**Lorem Ipsum** //dolor sit//
Insert the following code into the two ends of the text you want to modify its style, you can get the corresponding style. Nested style is supported. Insert a "\" into the code to escape formatting.
| Code | Description |
|---|---|
// |
Italic text. |
** |
Bold text. |
__ |
Underline text. |
-- |
Strikethrough text. |
`` |
Monospaced text. |
^^ |
Uppercased text. |
@@ |
Tint the text to the accent color. |
@^0 |
Tint the text to the color Black rgb(0, 0, 0). |
@^1 |
Tint the text to the color Red rgb(170, 0, 0). |
@^2 |
Tint the text to the color Yellow rgb(170, 85, 0). |
@^3 |
Tint the text to the color Green rgb(0, 170, 0). |
@^4 |
Tint the text to the color Cyan rgb(0, 170, 170). |
@^5 |
Tint the text to the color Blue rgb(0, 0, 170). |
@^6 |
Tint the text to the color Magenta rgb(170, 0, 170). |
@^7 |
Tint the text to the color Light Gray rgb(170, 170, 170). |
@^8 |
Tint the text to the color Gray rgb(85, 85, 85). |
@^9 |
Tint the text to the color Bright Red rgb(255, 85, 85). |
@^A |
Tint the text to the color Bright Yellow rgb(255, 255, 85). |
@^B |
Tint the text to the color Bright Green rgb(85, 255, 85). |
@^C |
Tint the text to the color Bright Cyan rgb(85, 255, 255). |
@^D |
Tint the text to the color Bright Blue rgb(85, 85, 255). |
@^E |
Tint the text to the color Bright Magenta rgb(255, 85, 255). |
@^F |
Tint the text to the color White rgb(255, 255, 255). |
+-3 |
Smaller text (6.2 pt). |
+-2 |
Smaller text (7.29 pt). |
+-1 |
Smaller text (8.55 pt). |
++1 |
Larger text (11.73 pt). |
++2 |
Larger text (13.7 pt). |
++3 |
Larger text (16 pt). |
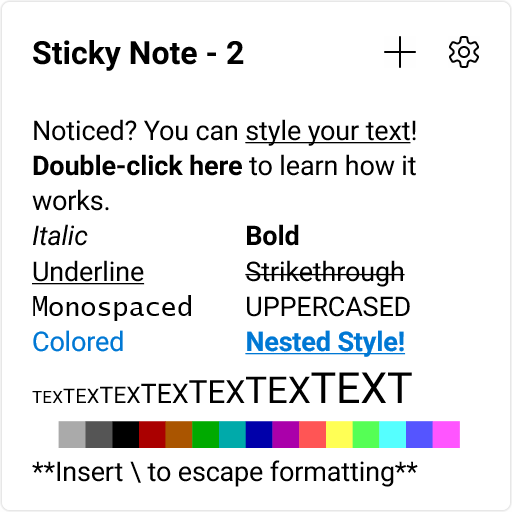
The following is a sample text and its rendering effect:

Noticed? You can __style your text__! **Double-click here** to learn how it works.
//Italic// **Bold**
__Underline__ --Strikethrough--
``Monospaced`` ^^Uppercased^^
@@Colored@@ __**@@Nested Style!@@**__
+-3TEX+-3+-2TEX+-2+-1TEX+-1TEX++1TEX++1++2TEX++2++3TEXT++3
@^F█@^F@^7█@^7@^8█@^8@^0█@^0@^1█@^1@^2█@^2@^3█@^3@^4█@^4@^5█@^5@^6█@^6@^9█@^9@^A█@^A@^B█@^B@^C█@^C@^D█@^D@^E█@^E
*\*Insert \ to escape formatting*\*

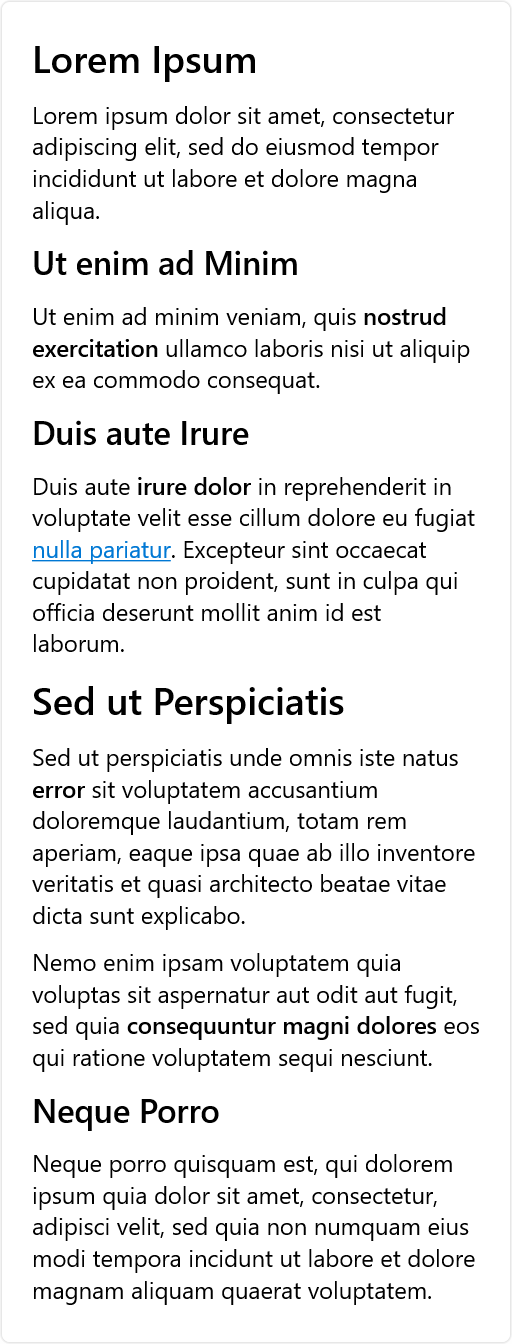
++3**Lorem Ipsum++3**

Lorem ipsum dolor sit amet, consectetur adipiscing elit, sed do eiusmod tempor incididunt ut labore et dolore magna aliqua.

++2**Ut enim ad Minim++2**

Ut enim ad minim veniam, quis **nostrud exercitation** ullamco laboris nisi ut aliquip ex ea commodo consequat.

++2**Duis aute Irure++2**

Duis aute **irure dolor** in reprehenderit in voluptate velit esse cillum dolore eu fugiat __@@nulla pariatur__@@. Excepteur sint occaecat cupidatat non proident, sunt in culpa qui officia deserunt mollit anim id est laborum.

++3**Sed ut Perspiciatis++3**

Sed ut perspiciatis unde omnis iste natus **error** sit voluptatem accusantium doloremque laudantium, totam rem aperiam, eaque ipsa quae ab illo inventore veritatis et quasi architecto beatae vitae dicta sunt explicabo.

Nemo enim ipsam voluptatem quia voluptas sit aspernatur aut odit aut fugit, sed quia **consequuntur magni dolores** eos qui ratione voluptatem sequi nesciunt.

++2**Neque Porro++2**

Neque porro quisquam est, qui dolorem ipsum quia dolor sit amet, consectetur, adipisci velit, sed quia non numquam eius modi tempora incidunt ut labore et dolore magnam aliquam quaerat voluptatem.
A monochrome icon is a flat icon that consists of only white and transparent parts, such as this one (use dark mode to view):
Here is an example:
[Mt.SampleMonoIcon]
Meter=Image
MeterStyle=St.ZnCt|St.Mi
X=(16*#Sc#)
Y=(16*#Sc#)
ImageName=#Pk@#Image\MonoIcons\16\Sample
W=(16*#Sc#)
H=(16*#Sc#)Apply this Style in response to a single hover Meter named H#CURRENTSECTION#.
Here is an example:
[Mt.Sample]
Meter=Image
MeterStyle=St.ZnCt|St.Mi|St.Bt.Gn
X=(16*#Sc#)
Y=(16*#Sc#)
ImageName=#Pk@#Image\MonoIcons\16\Sample
W=(16*#Sc#)
H=(16*#Sc#)

[HMt.Sample]
Meter=Shape
MeterStyle=St.ZnCt|St.Hv
X=(-4*#Sc#)r
Y=(-4*#Sc#)r
Shape=Rectangle 0,0,(24*#Sc#),(24*#Sc#),(#Cr#/2),(#Cr#/2) | #Da.Sk# | #Fl.Cl.Hv#
The HMt.Sample Meter is hidden by default and will only be displayed when the cursor is above the Mt.Sample Meter.
Apply this Style in response to a hover Meter group named H#CURRENTSECTION#.
Here is an example:
[Mt.Sample]
Meter=Image
MeterStyle=St.ZnCt|St.Mi|St.Bt.Mt
X=(16*#Sc#)
Y=(16*#Sc#)
ImageName=#@#Image\MonoIcons\16\Close
W=(16*#Sc#)
H=(16*#Sc#)

[Mt.Sample.Hover.1]
Meter=Shape
MeterStyle=St.ZnCt|St.Hv
X=(-4*#Sc#)r
Y=(-4*#Sc#)r
Shape=Rectangle 0,0,(24*#Sc#),(24*#Sc#),(#Cr#/2),(#Cr#/2) | #Da.Sk# | Fill Color 196,43,28
Group=HMt.Sample

[Mt.Sample.Hover.2]
Meter=Image
MeterStyle=St.ZnCt|St.Hv
X=(16*#Sc#)
Y=(16*#Sc#)
ImageName=#@#Image\MonoIcons\16\Close
W=(16*#Sc#)
H=(16*#Sc#)
Group=HMt.Sample
Mt.Sample.Hover.1 and Mt.Sample.Hover.2 Meters are hidden by default and will only be displayed when the cursor is above the Mt.Sample Meter.
Apply this Style in response to a hover Shape in this section.
Once this style has been applied, you need to add the modifier Extend Hover to the topmost shape in this Shape Meter instead of Fill.
Here is an example:
[Mt.SampleButton]
Meter=Shape
MeterStyle=St.ZnCt|St.Bt.Sp
Shape=Rectangle 0,0,(24*#sc#),(24*#sc#),(#Cr#/2),(#Cr#/2) | #da.sk# | #Fl.Cl.Ob#
Shape2=Rectangle (#sc#),(#sc#),(22*#sc#),(22*#sc#),(min((#Cr#/2-#sc#),0)),(min((#Cr#/2-#sc#),0))
Shape3=Combine Shape | Exclude Shape2
Shape4=Rectangle 0,0,(24*#sc#),(24*#sc#),(#Cr#/2),(#Cr#/2) | #da.sk# | #Fl.Cl.Ob#
Shape5=Rectangle 0,0,(24*#sc#),(24*#sc#),(#Cr#/2),(#Cr#/2) | #da.sk# | Extend Hover
When the cursor is moved to this Meter, the Meter will change color (depending on the color scheme you are using).
Change the properties of the Image Meter so that it becomes a Quick Resize portal.
Specifically, the Image Meter with this Style applied will become a Quick Resize portal. By default, when the cursor is placed on this Meter, the cursor will change shape, and holding down the left mouse button will change the skin to Resizing.ini Config, and then drag the mouse and release to complete the resize.
This Style changes the position of the Meter to the bottom right corner of the skin, so it is usually not necessary to change the position. To sum up, if you need to use the quick resize feature, you just need to add this section at the end of your Skin Config:
[Mt.Rsz]
Meter=Image
MeterStyle=St.ZnCt|St.Mi|St.Rsz
In general, if you need to modify its behavior, you can add the following two keys and modify them:
LeftMouseDownAction=[!Delay 500][!ActivateConfig "#CURRENTCONFIG#" "Resizing.ini"]
MouseActionCursorName=SIZE_NWSE

