-
-
Notifications
You must be signed in to change notification settings - Fork 22
Macros
Contents:

Note
Default macro parameters can be configured in the User Variables section of mymacros.cfg
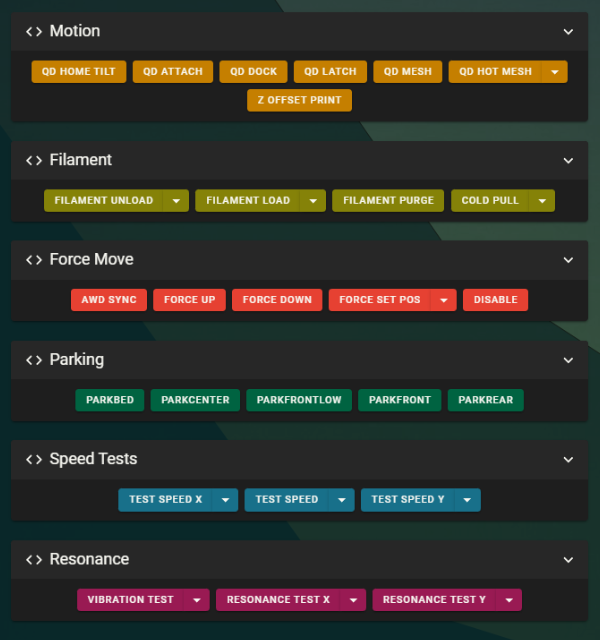
The LH Stinger Mainsail Theme and Macro layout can be found here: https://github.com/lhndo/LH-Stinger/tree/main/Config/Mainsail_Theme
Important
If the print finishes up very high, close to maximum Z, then you need to use FORCE DOWN macro before homing next time.
This is due to the probe requiring an initial Z Hop movement, which could cause collisions with the rail stops or the top extrusion.
Homing and Tilt procedure.
This is the most used macro for homing the printer.
Attaches probe
Docks probe
Locks probe
Performs Bed Mesh Calibration.
A temperature can be set from the dropdown menu. Defaults to 0
Prints the z_offset value from the configuration
Temperature can be set from the dropdown menu. Defaults to current temperature.
Temperature can be set from the dropdown menu. Defaults to current temperature.
Purges filament. Useful after loading filament.
Performs a semi-automatic Cold Pull procedure.
Requires lowering extruder print min temp in printer.cfg to 60C
When you hear the extruder perform the last fast retraction, go and pull out the filament by hand.
Temperature can be set from the dropdown menu. Default values work well for PLA.
Warning
The following macros force set the axis position without homing and can cause crashes.
Use with caution and double check the toolhead and bed positions before using them.
Helper macro for syncing AWD axis.
For more information please consult the Tuning guide
Moves the Z axis up by 30mm then disables steppers.
Moves the Z axis down by 30mm then disables steppers.
Important
If the print finishes up very high, close to maximum Z, then you need to use FORCE DOWN macro before homing next time.
This is due to the probe requiring an initial Z Hop movement, which could cause collisions with the rail stops or the top extrusion.
Sets the position to the test resonances (ADXL) probing location.
If that is not found, it defaults to X127 Y127 Z0.
Custom values can be set from the dropdown menu.
Disables steppers.
PARKBED, PARKCENTER, PARKFRONTLOW, PARKFRONT, PARKREAR
Park macros by Ellis.
Parks the toolhead to predefined positions.
Vibrates the printer at a set frequency. See dropdown menu for options.
Useful for debugging stray resonances.
Requires [resonance_holder] to be enabled in printer.cfg, and installing the module linked in the configuration.
Performs resonance testing and generates a resonance graph.
Dropdown Options:
- ACCEL_PER_HZ (APHZ) - Sets the accel per hz value
-
DR - (0/1) Enables damping ratio calculation
- This procedure is compute intensive and slows down testing. Recommended for final value generation only
Requires ResHelper
Used for testing the motion limits. Features individual axis testing and extended set of parameters (See dropdown menu for options).
Note: Ensure your steppers are synced when testing the limits for AWD axis.
If an AWD axis skips, then you are required to perform a sync procedure to ensure full torque delivery.
For more information please consult the Tuning guide
Based on Ellis's macro and optimized for cartesian motion systems.
The MAX_FAN dropdown contains a extensive links of controls that can override the slicer set fan speeds during printing.

- MAX_FAN (0-100%) caps the fan speed to the maximum percentage set
- FAN_MULTIPLIER (0.0 .. 1.0 .. n) multiplies the slicers set fan speed by a factor.
-
MANUAL_FAN/AUX takes total control over the fan speeds, and has the following behavior:
- -1 disables the manual fan control
- 0 turns fan off
- 1-100% manual fan speed
- LINK_AUX (0/1) links the Aux fan speeds to the Part fan
- AUX_RATIO when linked, it sets the ratio between the Part fan and Aux fan. 0.5 equals 50% of the Part fan speed
Quiet mode which can be toggled during print, or by setting QUIETMODE=1 in the slicer print start parameters.
The default behaviour can be configured in mymacros.cfg
Sets:
- Part fan capped at 50%
- Aux fan disabled
- Max Velocity capped at 200 mm/s
- Max Acceleration capped at 10000 mm2/s
- SCV is set to 5 and Min Cruise Ratio to 0.4
Turns steppers, heaters and fans off.
Restarts Klipper.
Scale acceleration value by factor. Default 1.0
If not using the provided LH Stinger- Orca Profiles, then set the following G-code in Printer section:
Machine Start G-Code:
PRINT_START_LHS BED=[bed_temperature_initial_layer_single] HOTEND=[nozzle_temperature_initial_layer] AUTOMESH=1 AUTOPURGE=1 QUIETMODE=0
Machine End G-Code:
PRINT_END
In Printer Settings > Custom G-Code set:
Start G-Code:
PRINT_START_LHS BED=[first_layer_bed_temperature] HOTEND=[first_layer_temperature[initial_extruder]] AUTOMESH=1 AUTOPURGE=1 QUIETMODE=0
End G-Code:
PRINT_END
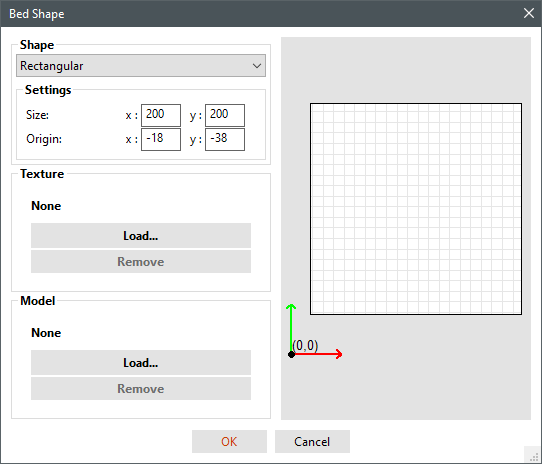
The printer supports multiple bed sizes. For ease of use, the bed position is defined in the slicer by changing the Origin Offsets, and not in Klipper's printer.cfg by changing position_endstop and position_min for the X/Y axis.
Calibration:
Move the nozzle manually to the front left corner of the bed, and note the position, eg. X18 Y38.
Add those values in the Origin section as negative values.
